If entering invoices from within the Smart Ops Release screen, see AP Invoices.

Inputting AP Invoices is easy. Users can either manually enter a new AP Invoice or import a CSV file of AP Invoice details. If the AP Invoice includes a Document Issues tab listed, see resolve Document Issues.
This article reviews the following:
- Create an AP Invoice
- AP Invoice Header
- AP Invoice Details
- AP Entry Shortcuts
- AP Invoice Actions
- Edit Approved AP Invoices
- Dates of Service
Security
The permissions listed here are associated with AP Invoices within Accounting. These permissions can be added to custom user roles or individual users. Learn more about managing permissions and custom user roles here.
Important Note: These permissions are for Accounting only and do not provide access to AP Invoices within Smart Ops.
AP Invoices permissions are found in the permission tree as follows:
- Accounts Payable
- AP Invoices
- View AP invoices Within Accounting
- Edit AP Invoices
- Edit AP Invoice Payment Terms & Due Date
- Create AP Invoices
- Use Pay Bill
- Mark Invoices as Paid
- Assign Missing Items
- Approve AP Invoices
- Unapprove AP Invoices
- Void AP Invoices
- Unvoid AP Invoices
- Delete AP Invoices
- AP Invoices
The Permission Access report can be used to determine which user roles or users already have these permissions assigned.
Learn more about User Setup and Security here.
AP Invoice Warnings
If a violation occurs on the AP Invoice screen, the following warning messages appear:
- Vendor Contract Price Violation - The vendor violated the set contract price, which can be entered on the Vendor Item record along with an acceptable variance %. Speak with a vendor representative to notify them of this issue.
- Item Category Threshold Variance - The item costs within an Item Category are beyond the acceptable variance threshold. This could be due to a cost increase by the vendor or an incorrect entry was made. If an incorrect amount was entered, ensure to verify that the each amount is the correct cost for this Inventory UofM 1 before saving, completing, or approving the invoice.
Accessing Invoices
- Hover over the Vendor tab in the top ribbon and select Invoice.
The AP Invoice screen appears.

AP Invoice Status and Controls
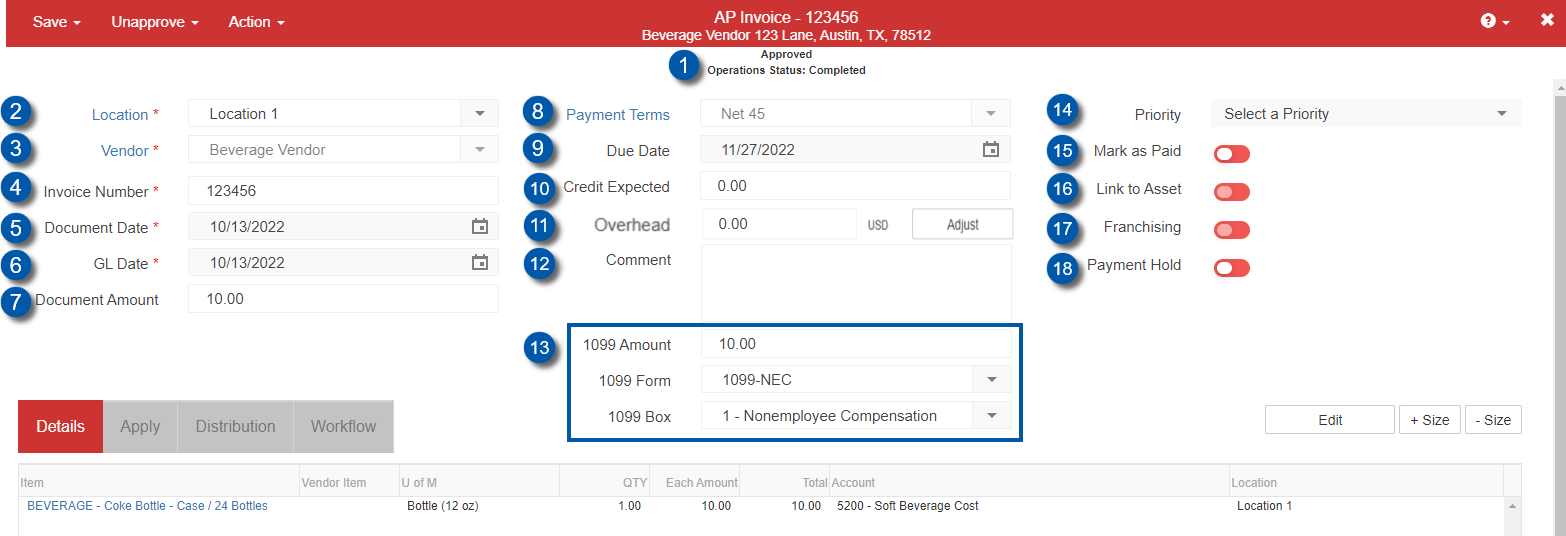
| Field | Description | |
 | Status | Displays the Transaction Status and Operations Status of the AP Invoice. The Transaction Status displays as Approved or Unapproved.
The Operations Status displays as Completed or In Progress.
|
 | Location | The Location field is automatically filled in to match the user settings but can be edited if necessary. When updated, the location information in the Details section automatically updates as well, unless otherwise noted in User Preferences. Note: Inactive locations are not available for selection. |
 | Vendor | Name of the vendor from which the invoice was received. Once the vendor is selected, the vendor's address appears in the top ribbon, and the 1099 fields are automatically filled with information from the vendor record. The Details section also updates to display information by account or by item, depending on the Vendor Entry method selected in the vendor record. |
 | Invoice Number | Vendor's invoice number. If no number is available, create a new one here. Note: If you are entering a large invoice, like a food invoice from your supplier, you can use the AP Invoice Import Function to import a pre-defined template with your suppliers invoice details. |
 | Document Date | Date on the invoice. |
 | GL Date | Date when the invoice posts to the General Ledger. Note: If the GL Date does not match the Document Date, an orange exclamation point icon appears to indicate a potential conflict.  |
 | Document Amount | Total original amount on the invoice, prior to discounts. If Alternate Currency Entry is enabled for your organization, two fields appear, including a field that displays the amount in the Entry Currency (the original currency for the invoice) and a read-only field that displays the amount in the Local Currency (the default currency for the organization). |
 | Payment Terms | Specify the terms by which the payment should be received. |
 | Due Date | Date on which payment is due. Default: Today's date. |
 | Credit Expected | Any amount shorted on a delivery. The Unassigned Amount appears highlighted below the Amount box and refers to the amount remaining to be assigned to a cost category. Refer to the Credit Expected article for more information about how to use the Credit Expected field on the AP Invoice record. |
 | Overhead | Any additional costs associated with the payment. If Alternate Currency Entry is enabled for your organization, two fields appear, including a field that displays the amount in the Entry Currency (the original currency for the invoice) and a read-only field that displays the amount in the Local Currency (the default currency for the organization). Note: Overhead is shown only on By Item vendors. |
 | Comment | This optional field can be used to add notes about a Credit Expected as well as other information to the AP Invoice, as demonstrated in the image below. Comments appear in the All Transactions and AP Transactions lists and can be used for sorting and filtering purposes. |
 | 1099 information | Displays 1099 information for the vendor, including: 1099 Amount - This amount equals the Document Amount field unless changed manually. If an invoice is duplicated and the 1099 amount is not equal to the Document Amount, the 1099 amount does not automatically update. A document cannot be Saved or Approved if the 1099 Amount is greater than the Document Amount or if the 1099 Amount is less than $0. 1099 Form - This field automatically populates with the type of 1099 form selected as the default form on the vendor record. The drop-down menu displays all forms that are marked as Active on the vendor record, which can be selected and used for this transaction. 1099 Box - This field will auto-populate to the default 1099 Box noted on the Vendor record. The drop-down selector lists all boxes for the selected 1099 Form, which can be updated if the 'Allow Box Override' checkbox is checked on the Vendor record. Otherwise, this field cannot be updated Note: If the 1099 Amount does not match the Document Amount, an orange exclamation point icon appears to indicate a potential conflict. Note: This section only appears if the vendor is a 1099 vendor. |
 | Priority | The priority assigned to this invoice, which can assist in identifying and prioritizing which payments that should be processed first to optimize cash flow. If the vendor is marked as a certain priority, this field automatically updates when the vendor is assigned but can be changed to any of the following values:
|
 | Mark as Paid | If On, an AP Payment is automatically created, and an additional field appears where the user selects the back account from which to make the payment. Note: If the fiscal period is closed for the legal entity of the location or the legal entity of the bank account, the transaction cannot be saved. |
 | Link to Asset | If On, the invoice details are linked to corresponding assets. |
 | Franchising | If On, franchisors can record and pay invoices on behalf of their franchisees and later bill the expense to the franchisee. For more information, see AP Invoice: Franchising. |
 | Payment Hold | If On, the invoice is put on hold and cannot be paid. For more information, see AP Invoice: Payment Hold. Note: If the Amount Remaining is zero, the toggle is automatically turned Off and cannot be turned On. |
AP Invoice Details
Invoice details can be entered in two different ways: Entry by Account or Entry by Item. Use this tab to add cost categories or items until the Unassigned Amount in the header is balanced. When finished, select Save & New to enter another invoice or Save & Close to exit the screen.
Tip: Ask your vendors to summarize their invoices by category. They are often very willing to do this, and it will speed up data entry for you.
Entry by Account (Cost Categories)

| Field | Description | |
| Use Preset Allocations | If On, the user can choose from a list of preset allocations. A Preset Allocation spreads the amount entered to the preselected GL Accounts and locations based on preset allocation percentages. |
| Account | Cost category. |
| Amount | Amount for the category. |
| Comment | This optional field can be used to enter notes about the line item. |
| Location | Location receiving the order. If multiple locations or location groups are selected, the amount is distributed equally among all locations. |
| Start Date of Service | The date that the range of service begins. This is optional and often used for bills that extend over the end of the month / period (i.e. a utility bill dated 5/10/2019 with Dates of Service from 4/10/2019 to 5/9/2019). Note: If legacy data was entered before the replacement of the Accrual tab, dates for older AP Invoices appear in the Details tab. |
| End Date of Service | The date that the range of service ends. This is optional and often used for bills that extend over the end of the month / period (i.e. a utility bill dated 5/10/2019 with Dates of Service from 4/10/2019 to 5/9/2019). Note: If legacy data was entered before the replacement of the Accrual tab, dates for older AP Invoices appear in the Details tab. |
| Add / Clear | Add information to the line or clear information from the line. |
Entry by Item

| Field | Description | |
| Use Preset Allocations | If On, the user can choose from a list of preset allocations. A Preset Allocation spreads the amount entered to the preselected GL Accounts and locations based on preset allocation percentages. |
| Item | Item from the invoice. Note: AP Entry users can select Missing Item from this selector if the item is not set up in R365. Once saved, a Missing Items tab appears where an Accounting user can review and assign the Missing Item in R365. |
| Vendor Item | Name of the vendor item. This field is automatically populated based on the setup information for the item. |
| U of M | Unit of Measure. This field is automatically populated based on the setup information for the item. |
| Quantity | Number of items. |
| Each amount / Overhead amount | Cost per item. If Alternate Currency Entry is enabled for your organization, two fields appear, including a field that displays the amount in the Entry Currency (the original currency for the invoice) and a read-only field that displays the amount in the Local Currency (the default currency for the organization). |
| Total | Generated amount based on the quantity entered. (Quantity x Each Amount = Total) |
| Account | Account. This field is automatically populated based on the setup information for the item. |
| Location | Location receiving the order. If multiple locations or location groups are selected, the amount is distributed equally among all locations. |
| Start Date of Service | The date that the range of service begins. This is optional and often used for bills that extend over the end of the month / period (i.e. a utility bill dated 5/10/2019 with Dates of Service from 4/10/2019 to 5/9/2019). Note: If legacy data was entered before the replacement of the Accrual tab, dates for older AP Invoices appear in the Details tab. |
 | End Date of Service | The date that the range of service ends. This is optional and often used for bills that extend over the end of the month / period (i.e. a utility bill dated 5/10/2019 with Dates of Service from 4/10/2019 to 5/9/2019). Note: If legacy data was entered before the replacement of the Accrual tab, dates for older AP Invoices appear in the Details tab. |
 | Add / Clear | Add information to the line or clear information from the line. |
AP Entry Shortcuts

Use the following keyboard shortcuts to change selected locations:
- Move between fields by pressing Tab.
- Use the up / down arrows to highlight a location to add or remove.
- Enter / Return selects a location.
- Backspace / Delete removes a selected location.
- Add a row by pressing Enter / Return when the Add button is highlighted.
AP Invoice Actions
AP Invoices offers the following actions for all Accounting Managers and Full Access users.

| Field | Description |
| Delete | Deletes the transaction. |
| Memorize | Saves the transaction as a template for future invoices. |
| Duplicate | Creates a copy of the transaction. Duplicated transactions are saved as unapproved transactions at the time of their creation. |
| Pay Bill | Generates a check for the vendor to pay for the invoice. Note: Pay Bill is only available for vendors who are paid by check. |
| Email Credit Request | Emails the vendor for the listed Credit Expected amount. Before performing this action, ensure that the Credit Expected field contains the correct amount and enter an explanation in the Credit Comment field. These details are included in the generated email. |
| Transaction Summary | Creates a report that lists the entries in the Details tab. |
| Import | Enables the user to import an R365 AP Invoice CSV file, which automatically populates the AP Invoice screen with matching fields. |
| Email Link | Displays a link (URL) for the invoice that can be shared with another R365 user. |
| Spread | After approving the AP Invoice, this will enable the user to spread the transaction of a designated period of time. Click here to learn more about transaction spreading. |
Edit Approved AP Invoices

Approved AP Invoices can be edited without the hassle of unapproving a transaction first. To edit an approved invoice, users need the following permission:
- Accounts Payable → AP Invoices → Unapprove AP Invoices
Upon opening an Approved AP Invoice, the Edit button above the Details section. Select Edit to update any necessary details. When finished, select Edit Complete to save the changes made.
Dates of Service
Dates of Service allows a user to record expenses in the correct period, even though the Dates of Service might expand over multiple months.

To activate Dates of Service,
- Hover over Administration in the top ribbon and select Preferences.
- When the System Preferences window opens, navigate to the Miscellaneous tab.
- At the bottom right-hand corner of the header, select Display Accrual During AP Entry.
Dates of Service now appears on the AP Credit Memo.
Dates that are added into an AP Invoice can be viewed in the Transaction Details list with two postings made to their GL Accounts and their Start Date and End Date posted in the respective date columns. These transactions can be exported and used to calculate a User's accrual.