
Bank Accounts are essential in Restaurant365. Each Bank Account record represents a Bank Account that is part of your organization and is used in the finances and operations of your Restaurant Organization.
Bank Accounts exist as GL Accounts in Restaurant365. Any GL Account with a GL Type that resides on the 'Balance Sheet' can be classified as a Bank Account. This is accomplished by checking the 'Is Bank Account' checkbox on the GL Account Record. Click here for more information on GL Account Records. To create a new Bank Account, please see the Add a New Bank Account training.
GL Accounts that have been identified as Bank Accounts, will appear in both the 'GL Accounts' list (in the 'General Ledger' subsection) and 'Bank Accounts' list (in the 'Banking' subsection). Additionally the GL Account/Bank Account will be made available on the Bank Activity and Bank Reconciliation screens. Click here for more information on Bank Activity, and Bank Reconciliation.
- Please Note: the 'Is Bank Account' checkbox will only appear when a GL Type with the Financial Report setting of 'Balance Sheet' is selected in the GL Type selector. If the GL Account is a Profit & Loss Account (and therefor has a GL Type that has the Financial Report setting of 'Profit & Loss') this checkbox will not appear and the GL Account cannot be used as a Bank Account. When 'Is Bank Account' is checked, the Bank Account fields will appear in the 'Banking Info' section of the 'General' tab
General Tab

1) Account Owner - The Legal Entity that owns this Bank Account
2) Bank - The name of the Bank connected to this Bank Account. This field is not required and is only necessary if you intend to export ACH or Positive Pay from this Bank Account. Click here for more information on the Bank Record
- Note: This field is required when the Bank Account will be used for R365 Payments. Click here to learn about R365 Payments
3) Account Type - The Bank Account type. Options include:
- Checking
- Credit Card
- ZBA (Zero Balance Account)
- Saving
4) Bank Account Number - The Account Number of the Bank Account. Click here for more information on Canadian Account Number Formatting
- Note: This field is required when the Bank Account will be used for R365 Payments. Click here to learn about R365 Payments
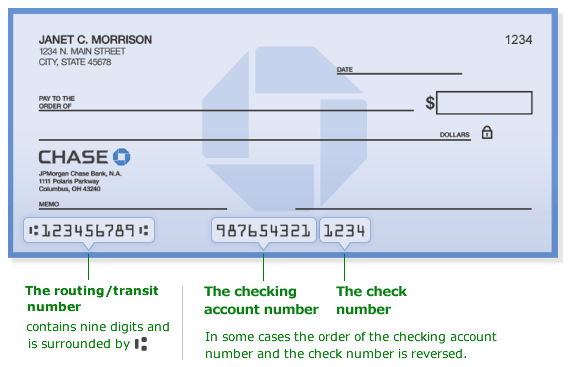
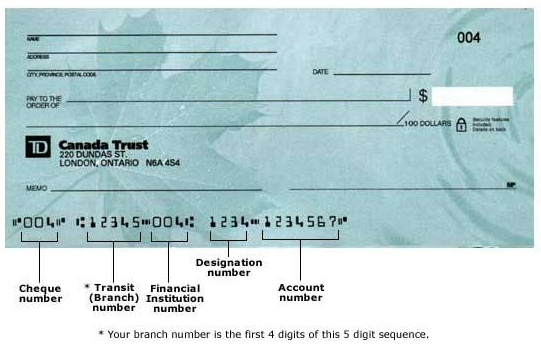
5) Routing Number - The 9-digit routing number (USA) / Transit Number (CANADA) of the Bank Account. See the screenshots below for examples of each Check Format. Click here for more information on Canadian Transit Number Formatting
- Note: This field is required when the Bank Account will be used for R365 Payments. Click here to learn about R365 Payments
6) Bank User Name - This is a deprecated feature and is no longer used with the release of Direct Bank Connections
7) Bank ICD - The Bank ICD value for this Bank Account. This value must be set when using the 'ACH Export - TD Bank' report (set on the Bank record). It specifies the ANSI One-digit Identification Code Designators (ICD) for the Bank, and correctly sets the value on ACH Exports
8) Positive Pay Bank ID - The Positive Pay ID number provided by the Bank Account when Positive Pay is set up. This entry is read-only and auto-populates when the bank account connects with R365
9) Manage Bank Connections - This button lets you add, edit, or remove the online connection to your bank. When clicked, a new window will open where you can manage your bank connectivity
10) Default Location - The Default Location that will use this Bank Account within the Legal Entity selected in #1. This field will help drive the intercompany accounts when money is transferred to Cash Accounts controlled by other Legal Entities
11) Exclude from Payments - Check this box if this Account is for Deposits only. When checked, this Bank Account will not appear as an option on the Check Run and Manual Payment screens
12) Bank Name (on Check) - The Name of the Bank that will appear on the printed check
13) Check Format - Select the Check format for this Bank Account. Options include:
- United States
- Click here for more information on Setting Up American Checks
- Canada
- Click here for more information on Setting Up Canadian Checks
14) Next Check Number - The next available check number. This will be used when printing physical checks from this Bank Account and will display in the MICR line on the check. It is important that these be exactly the same as given to you by your bank. This value will also automatically increment each time you print a check from R365
15) Select Signature - Click this button to open the Upload Signature prompt where the user can upload a signature file that will print on physical checks when 'Print Check with Signature' is selected. Click here for more information Check Signatures.
- Note: In order to Print Checks with Signature, a User must first have the following Permissions:
- Accounts Payable → AP Payments → Print Checks w/Signature
- Accounts Payable → Payment Runs → Print Checks w/Signature in Payment Runs
16) Print Second Signature Line - Click this box if a second signature is desired on Checks from this Bank Account. When checked, the 'Threshold' field will appear, where you can set the dollar threshold that will require a second signature. On your printed checks, a second signature line will appear above the regular signature line. When using 'Print Check with Signature', the uploaded signature image (#15) will print on the first signature line while the second signature line will remain blank and must be manually signed. Please see below for Second Signature example scenarios:
- Checks greater than $0.00 (all Checks) require a second signature. Check the 'Print Second Signature Line' checkbox and enter '0' in the 'Threshold' field
- Checks equaling $5,000 and above require a second signature. Check the 'Print Second Signature Line' checkbox and enter '5000' in the 'Threshold' field

17) Last Reconciled Date - The date the Account has been reconciled through on the Bank Reconciliation
18) Last Reconciled Balance - The Balance of the Account as of the last reconciliation through the Bank Reconciliation
19) Last Bank Activity Upload Date - The date of the last upload to the Bank Activity Screen for this Bank Account
20) Last Bank Activity End Date - This field is not required and was previously used in conjunction with Bank Activity. It is no longer used and serves only as a reference
21) Legal Entities - A count of the number of Legal Entities with access to the account based on the assigned Locations
22) Locations - A count of the number of Locations with access to the account
23) Status - The setup status for R365 Payments. This reflects the status on the 'Payments' tab of System Preferences. Statuses include:
- Pending Account Setup - This represents the need for the User to complete the required fields for one or more Vendors and/or Bank Accounts. Additionally, the User will need to add Payment Users on the 'Payments' tab of System Preferences. If a Vendor or Bank Account is not used, they can be opted out by being disabled on their record
- Pending Account Verification - This shows that all required fields for the 'Pending Account Setup' status are complete and ready to be verified
- Enabled - This shows that all required fields have been verified and payments are ready to be sent
24) Exclude from R365 Payments - This checkbox will only appear when R365 Payments is enabled for your Organization. When checked, this will exclude this Bank Account from R365 Payments. Doing so will also remove the requirement to complete additional fields for R365 Payments
Routing Number Example
United States Checks
Transit Number Example
Canada Cheques
Other Tabs
For more information on the 'Transactions', 'Report Settings', 'Budget Defaults' and 'Location' tabs, please refer to each respective section on the GL Account Record.