
The Documents to Process screen in Accounting allows users to upload a PDF or a scanned image of an AP Invoice (or AP Credit Memo) to the system and then enter the details of the transaction at a later time. This is different from the EDI process where invoice details can be imported from a CSV file.
Documents to Process exists for the instances when you need to import an invoice or credit memo using a different file format, such as a PDF or image file. Invoices are marked by priority and date and can be assigned to certain users for future data entry.
Benefits of the Documents to Process feature include:
- Multiple AP / CM transaction files can be uploaded to the system (even in the same PDF file) and then entered at a later time.
- Vendors can send AP / CM transaction files directly to an R365-generated email address or hosted FTP folder location without any required action from the Restaurant Group. These files are imported automatically and reside, awaiting processing, in the Documents to Process list view.
- AP / CM transaction files can be uploaded at the Restaurant level and made immediately available to users at the Corporate level.
- AP / CM transaction files are automatically attached to the transaction record in R365 for audit purposes.
- AP Invoices can be created and entered directly from the Documents to Process page.
- Documents can be locked to limit the amount of multiple invoice entries when users enter from the Documents to Process screen.
Article Topics
- Uploading Files to Documents to Process
- Security
- Navigation
- About the Documents to Process page
- Creating AP Invoices or Credit Memos
- Bulk Edit
- Documents to Process Saved Grid Views
- Related articles
Uploading Files to Documents to Process
To begin using Documents to Process, determine the preferred method of uploading documents. Then, perform the necessary set up for the desired upload method.
- AP Automation - R365 generates an email address to receive AP Invoices from vendors. Your organization's email address, as well as the ability to whitelist vendors email addresses, can be configured on the AP Processing Email tab of System Preferences.
- FTP - Vendors upload AP transactions to a hosted site via EDI.
- Manual Upload - Users upload PDFs and images from a web browser or using the R365 Red App.
Click here for more information on Documents to Process Upload Methods.
Security
The Permissions listed here are associated with Documents to Process. These Permissions can be added to Custom User Roles or single users. Learn more about managing Permissions and Custom User Roles here.
Documents to Process permissions are found in the permission tree as follows:
- Food
- Docs to Process
- View Docs to Process Within Document Library
- Note: Users must have this permission to access the Docs to Process in Smart Ops.
- View Docs w/Unassigned Location
- Edit Docs to Process Documents
- Upload Docs to Process Documents
- Delete Docs to Process Documents
- View Docs to Process Within Document Library
- Docs to Process
- Accounts Payable
- Docs To Process
- View Docs to Process within Accounting
- Note: Users must have this permission to access the Documents to Process in Accounting.
- View Docs to Process Log
- View Docs w/ Unassigned Location
- Edits Docs to Process Documents
- Delete Docs to Process Documents
- View Docs to Process within Accounting
- Docs To Process
The Permission Access report can be used to determine which user roles or users already have these permissions assigned.
All other users (including non-users, such as vendors) have the ability to upload Documents to Process using AP Automation or FTP when granted access to those upload methods (R365-generated email address and FTP site credentials, respectively).
Navigation
Documents to process can be accessed in either Smart Ops or Accounting.
Smart Ops
Important Note: This excludes Users who have the View AP Invoices in Accounting permission. |  |
 |
Accounting
|  |
About the Documents to Process page
There are two ways to view the Documents to Process screen: the card view and the table view. The table view allows users to perform bulk actions by selecting multiple documents. The card view allows users to details alongside a thumbnail image of the document.
For information about all fields and controls, see Documents to Process page.
Creating AP Invoices or Credit Memos
AP Invoices and Credit Memos can be created from both the Accounting module of the Classic version of R365 and the Smart Operations module.
Classic Accounting Module

When the Create button is selected, the AP Invoice form opens in a new window with a preview of the uploaded file displayed for easy reference.
- Note: .xls and .xlsx files do not appear as a preview.
- Note: The preview menu bar only appears for .pdf, .doc, and .docx files.
To enter an AP Credit Memo instead, hover over the Action menu in the top ribbon and then select Switch to Credit Memo.


The Report Issues and Mark as Archived buttons located just above the attached document enable the user to mark the document accordingly:
- Report Issues - This button allows the user to report any issues associated with the AP Invoice/Credit Memo. When selected, a list of potential issues appears, along with a custom field where unique issues can be entered and selected.

- Mark as Archived - This button marks the AP Invoice/Credit Memo as a duplicate and archive it. This is beneficial for entry users so that they can hide duplicates of an invoice or skip a duplicate rather than entering in multiple invoices by mistake.
All AP Invoices and Credit Memos that have an issue reported will have the Document Issues tab added to the transaction after it is initially saved.
Smart Ops Module
Note: Users do not need to have Accounting credentials to open a Smart Ops Ap Invoice/Credit Memo.

When the Create button is selected on a document in Smart Ops, an AP Invoice form appears in a new tab.
To enter in a Credit Memo instead, edit the Doc to Process and change it to a Credit Memo before clicking Create.
The AP Invoice or Credit Memo side sheet opens automatically into the split view with the AP Invoice form on the left and the attachments sheet on the right.
When all required fields are completed, the Save button is enabled.
Bulk Edit

Clicking on one or more of the document checkboxes opens the Bulk Edit menu. Actions taken in the Bulk Edit menu apply to all of the selected documents.
Edit
- Select the Edit icon
 to edit the following document details:
- Document Type (Invoice or Credit Memo)
- Location
- User
- Priority
- Select Update to save and apply changes or select the X to close without saving.

Delete
- Select the Delete icon
 to delete the selected documents.
A confirmation dialog box appears. - Select Delete to confirm or Cancel to close without deleting the selected documents.

Attach to Existing
- Select the Attach to Existing icon
 to open a sidesheet with existing AP transactions.
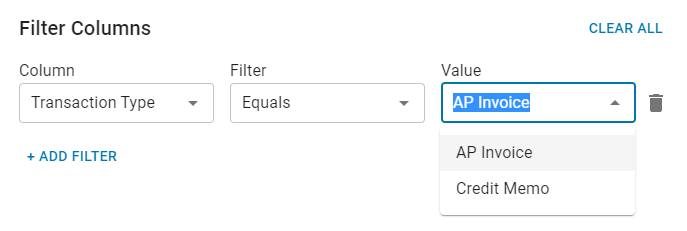
This list is filtered for AP Invoices by default. To view Credit Memos, change the filter from AP Invoice to Credit Memo. - Select Attach to attach the selected document to the AP Invoice or Credit Memo.

Merge
- Click the Merge icon
 to merge the selected documents.
Note: If the documents cannot be merged, a notification appears when hovering over the Merge icon.
Note: If the documents have conflicting Locations, Document Types, or Assigned To details, a confirmation dialog box asks if the conflicting value should be removed. If merged, the conflicting field must be manually re-entered.
Archive
- Click the Archive icon
 to archive the selected Documents.
A confirmation dialog box appears. - Select Archive to confirm or select Cancel to close without archiving the document.

Documents to Process Saved Grid Views

Two unique saved grid views are included to help review, add, and/or resolve issues for documents in the Documents to Process queue. These saved views include:
- Issues - Unapproved - This saved view lists all unapproved transactions created through R365 Payments and that have an issue added by the R365 AP Entry Team or a System User. The issues listed on the AP Transaction appear in the designated column, either Issue Data Entry or Issue Customer Reported, depending on who noted the issue.
- Processed - Unapproved - This saved view lists all Unapproved AP Transactions created through R365 Payments.
Click here to learn more about Saved Grid Views.
Related articles
Documents to Process: Upload Methods
Files can be uploaded to Documents to Process manually, using FTP, or using AP Automation.
AP Automation requires that a vendor send attachments to a R365-generated email address via the AP Processing Email tab of System Preferences.
Multiple files can be uploaded at once to location-specific folders using the FTP Site.
Documents to Process: Reviewing documents with AP Capture AI
AP Capture AI uses Optical Character Recognition (OCR) can help users save time and resources by automating AP Invoice processing.
Documents to Process: Uploading Files via AP Automation
Email Supported File Types for automatic upload.
Documents to Process: Uploading Files via FTP
Upload multiple files to using the FTP Site.
Documents to Process: Manual Upload
Manually upload individual files.
Documents to Process: Log and Errors
The Documents to Process Log can be used to identify any errors in uploaded files and how to re-import after errors have been resolved.
Once documents are uploaded, they can be entered into the system.
View attachments side-by-side with the transaction and refer to the attachment while entering details.
Learn more about the AP Invoice form in the Smart Ops Experience or the AP Invoice form in the Classic Experience.
Learn more about the AP Credit Memo in the Classic Experience.