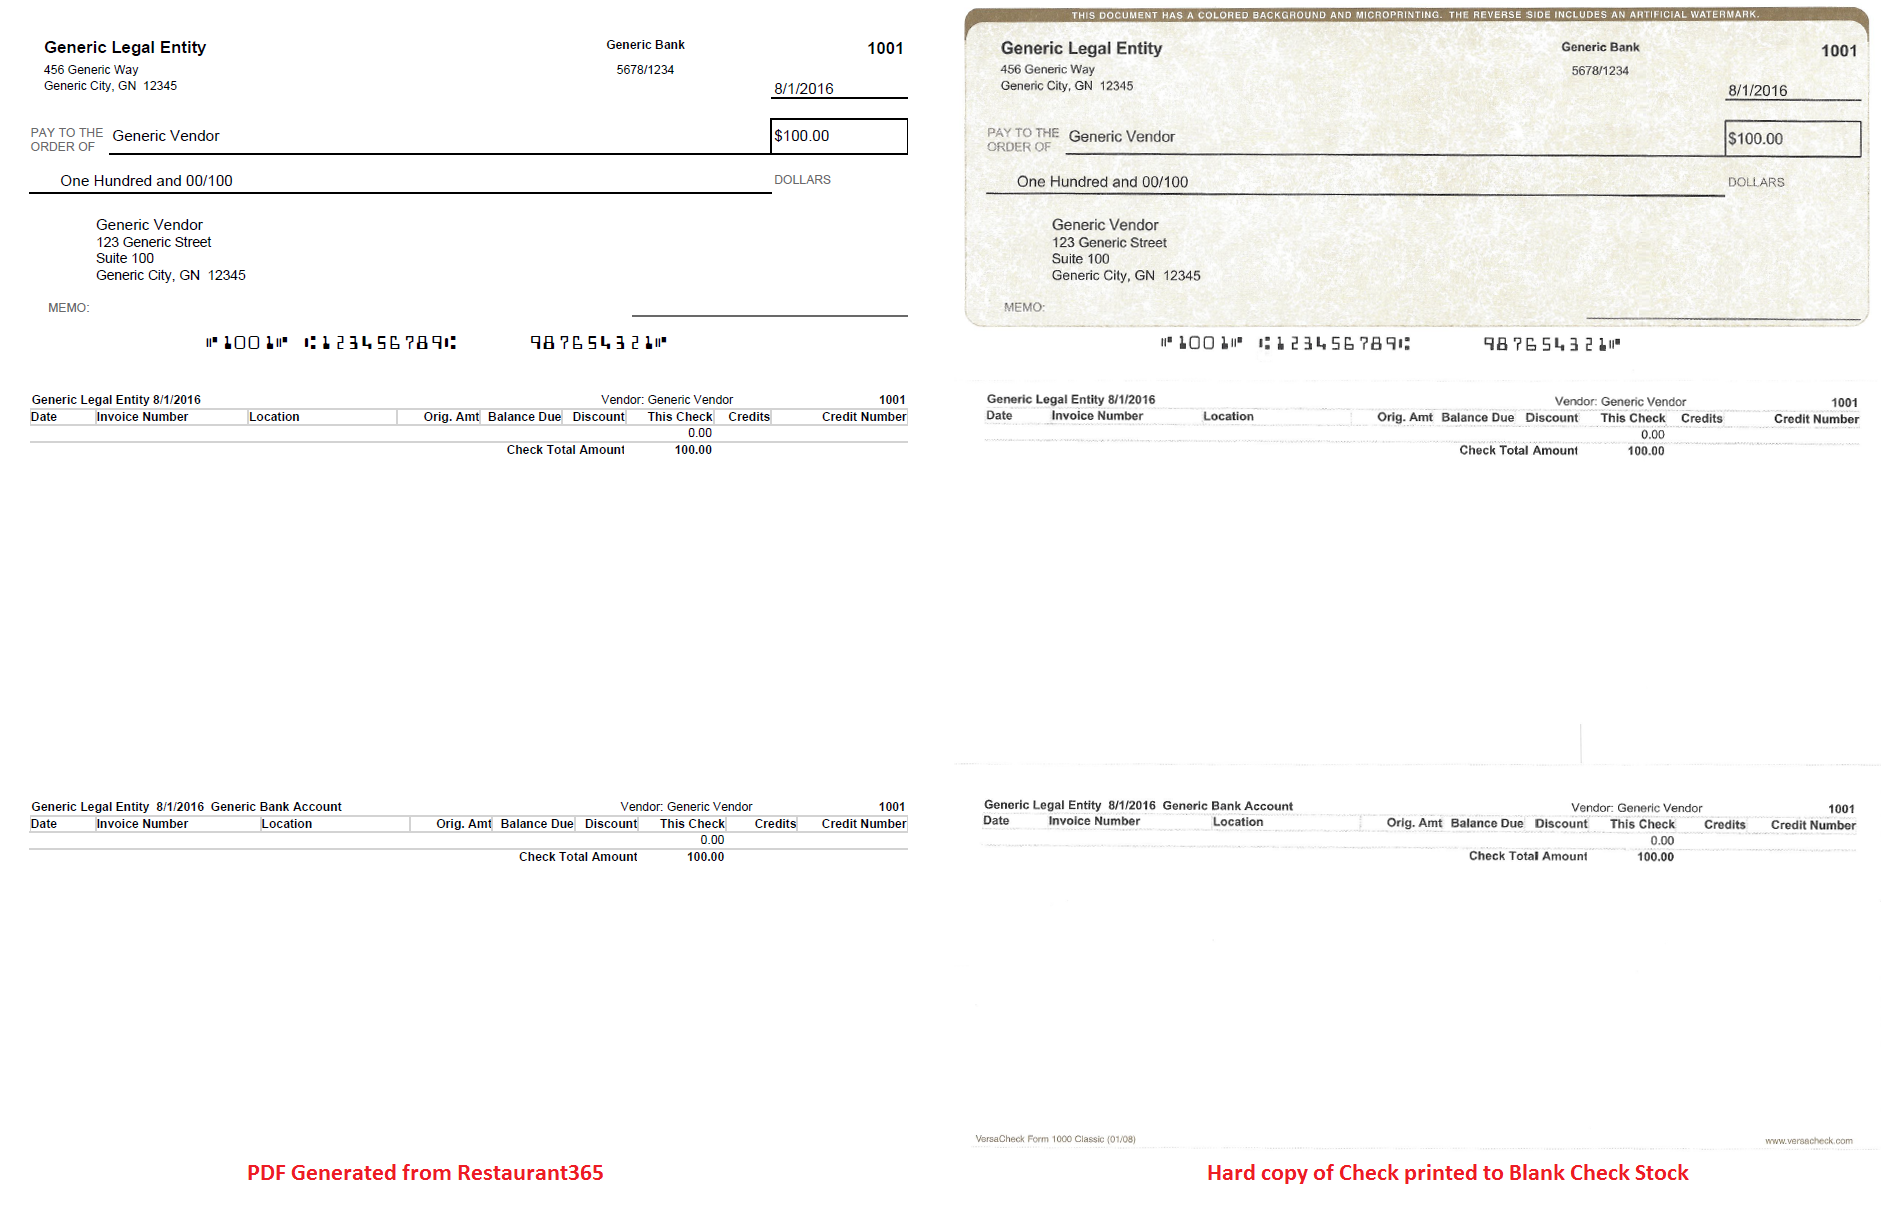
Restaurant365 allows users to print their own checks without relying upon pre-printed check stock. This gives users greater flexibility and added security as they will not have to keep pre-printed check stock on premises, or under lock and key. Blank check stock also offers additional convenience, allowing you to print multiple checks to multiple Vendors in a single payment run. The blank check stock can be used for multiple checkbooks and multiple payment runs all without the need to change the check stock in the printer.
Before you can print checks using Restaurant365, Bank Accounts must be setup correctly, and the required check stock, MICR toner/printers must be purchased. For details on how to prepare for check printing, please see the following trainings: USA Check Printing Setup and/or Canada Check Printing Setup.
Article Topics
- Check Printing Permissions
- Printer Settings
- Printing Checks
- Option 1 - Pay a check from within a single Invoice - Pay Bill / Pay with ACH
- Option 2 - Create Multiple Checks from existing Invoices - Payment Run
- Option 3 - Create an AP Payment without an existing AP Invoice - Manual Payment
- Option 4 - Create a Bank Expense from the Banking menu (non-AP Transactions) - Withdrawal
- Print Check with Signature
Check Printing Permissions
The Permissions listed here are associated with Printing Checks. These Permissions can be added to Custom User Roles or single Users. Learn more about managing Permissions and Custom User Roles here.
Check Printing Permissions are found in the Permission Tree as follows:
- Accounts Payable
- AP Payments
- Email Check Stubs
- Print Checks
- Print Checks w/Signature
- Reprint Check Stubs
- Payment Runs
- Print Checks w/Signature in Payment Runs
- Print Checks in Payment Runs
- AP Payments
The Permission Access report can be used to determine which User Roles or Users already have these Permissions assigned.
Learn more about User Setup and Security here.
Printer Settings
You will need a printer that supports borderless printing to properly print checks in Restaurant365. Borderless printing means that you have the ability to print any PDF file without margins. This feature is common among printers and printing software. Google Chrome, the preferred browser of Restaurant365, also supports borderless printing from the Google Chrome Print prompt. Ensure the proper settings are in place to print checks.
Note: The font used when printing checks is Arial 10pt, and cannot be changed.
Google Chrome Print Prompt
When printing from Google Chrome, select More Settings to expand additional sizing options. Change settings such as Layout, Margins, and Scale to fit the check to your blank check stock.

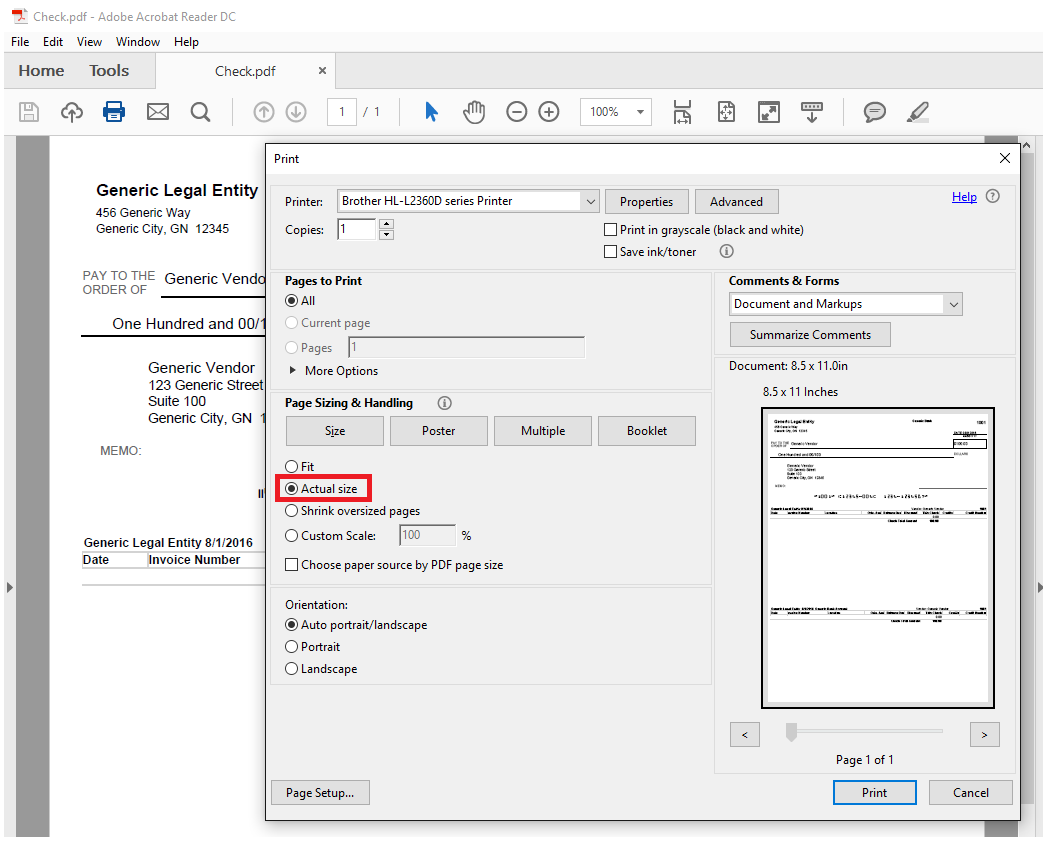
Adobe Reader Print Prompt
When printing from Adobe Reader, ensure that Actual Size is selected under the Page Size & Handling heading.
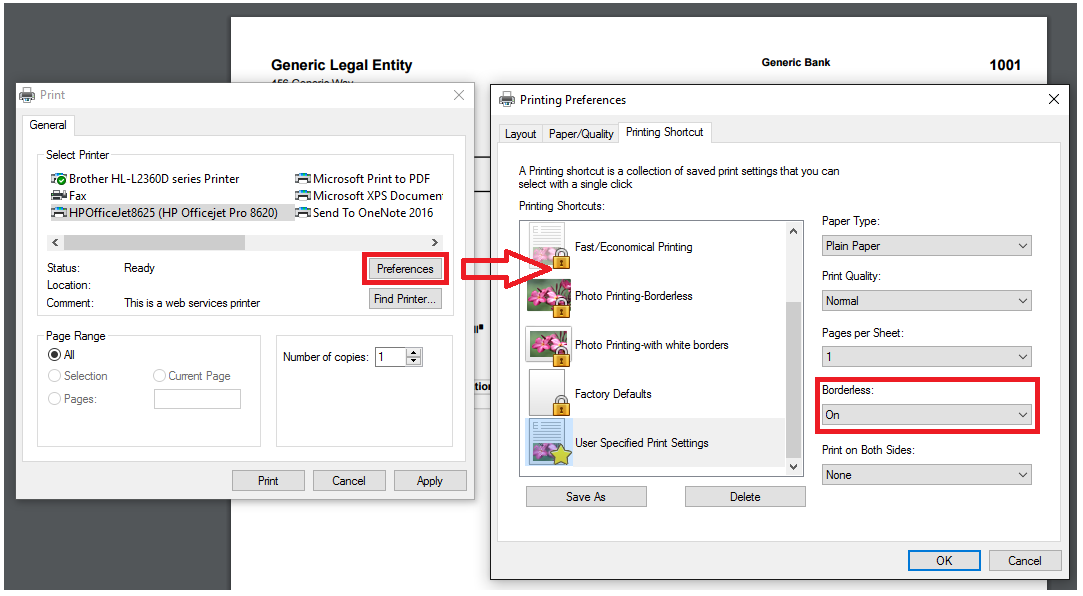
System Dialog Prompt
When using your system dialog, click on the Preference button below Select Printer. If your printer supports Borderless printing, you should see options similar to those in the sample image below. Enable Borderless printing by selecting On and clicking OK. If there are no Borderless settings available, please use Google Chrome or Adobe Reader to print checks from Restaurant365.
Printing Checks
There are four different ways to print a check to PDF in Restaurant365. Each of the following four sections explain the necessary steps to create a check via the particular method noted. Each step results in a generated PDF that can then be printed on to a physical check. Physical prints will be accomplished using your printer and system or browser dialog.
Option 1 - Pay a check from within a single Invoice - Pay Bill / Pay with ACH

While viewing an AP Invoice, hover over the Action menu and select Pay Bill / Pay with ACH. Depending on the vendor's Payment Method, you will see either option.
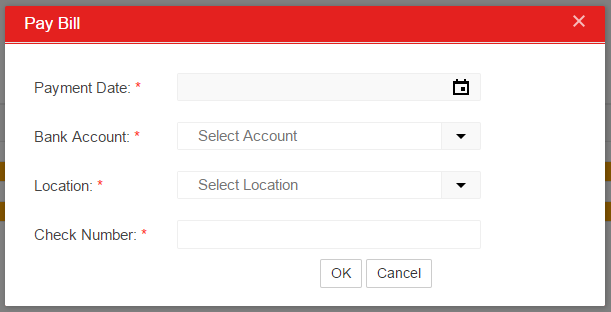
Clicking Pay Bill will open either the Pay Bill prompt or the Pay with ACH prompt. The two are nearly identical with the ACH prompt varying in the Check Number, auto-set to ACH. The OK button replaced with Create. On this prompt, the user can enter the Payment Date, select the Bank Account, set the Payment Location, and enter/adjust the Check Number (the next available check number will populate upon selecting the Bank Account). Upon completing these fields, click the OK/Create to generate the Check / ACH Payment.
Clicking OK will generate a PDF of the check that will be saved to your default download location and can then be opened, and printed using your browser or system dialog.
Following the generation of the PDF, Restaurant365 will open an additional prompt where the user will need to select an option to specify the results of the check printing:

- Printed Successfully - This action completes the Bank Expense (Withdrawal), closes the prompt, and marks the invoice as paid (applies the payment)
- Note: When a check is Printed Successfully, the PDF cannot be printed again for security purposes
- Reprint Now - This action will regenerate the PDF to be printed again
- Reprint Later - This action closes the prompt, leaving the Bank Expense (Withdrawal) un-applied and not printed
Option 2 - Create Multiple Checks from existing Invoices - Payment Run

To pay multiple existing Approved AP Invoices, utilize the payment run to generate multiple checks at once. Accounting Managers and Account Clerks have access to the Payment Run screen. Click here for detailed information on Payment Run.
Option 3 - Create an AP Payment without an existing AP Invoice - Manual Payment

Manual Payments are AP Payments that are created prior to entering an AP Invoice in to Restaurant365. Essentially, creating a Manual Payment is creating the second half of the AP Invoicing process before completing the first half, or rather, creating the AP Invoice.
To create a Manual Payment, hover over the Vendor menu and select Manual Payment. A new AP Payment tab opens where the user can enter in all of the required information for the AP Payment.
- Note: Users with the following Permission will be to create a Manual Payment, but they will not be able to print check on a Manual Payment until that payment is approved:
- Accounts Payable → AP Payments → Create Manual AP Payments

Once the AP Payment has been approved, the Print Check button will appear in the header.

- Printed Successfully - This action completes the Bank Expense (Withdrawal), closes the prompt, and marks the invoice as paid (applies the payment)
- Note: When a check is Printed Successfully, the PDF cannot be printed again for security purposes
- Reprint Now - This action will regenerate the PDF to be printed again
- Reprint Later - This action closes the prompt, leaving the Bank Expense (Withdrawal) un-applied and not printed
Option 4 - Create a Bank Expense from the Banking menu (non-AP Transactions) - Withdrawal

For non-AP transactions, a check can be printed by creating a Bank Withdrawal on the Banking Menu.
To create a Withdrawal, hover over Banking and select Withdrawal. Doing so will open a new tab where a Bank Expense (Withdrawal) can be entered. Users with the following Permission will be able to create a Bank Expense (Withdrawal), but they will not be able to print check on a Manual Payment until that Bank Expense (Withdrawal) is approved:
- Banking → Bank Withdrawals → Create Bank Withdrawals

Upon completion of all the required fields, hover over Action and select Print Check to generate the check.

Clicking Print Check will generate a PDF of the check that will be saved to your default download location and can then be opened, and printed using your browser or system dialog.
Following the generation of the PDF, Restaurant365 will open an additional prompt where the user will need to select an option to specify the results of the check printing:
- Printed Successfully - This action completes the Bank Expense (Withdrawal), closes the prompt, and marks the invoice as paid (applies the payment)
- Note: When a check is Printed Successfully, the PDF cannot be printed again for security purposes
- Reprint Now - This action will regenerate the PDF to be printed again
- Reprint Later - This action closes the prompt, leaving the Bank Expense (Withdrawal) un-applied and not printed
Print Check with Signature
In order to Print Checks with Signature, a User must first have the following Permissions:
- Accounts Payable → AP Payments → Print Checks w/Signature
- Accounts Payable → Payment Runs → Print Checks w/Signature in Payment Runs
For more information on printing checks with signature, see the Bank Account Record and Check Signatures training articles.