This article reviews the Labor Review step for the Daily Sales Summary in Smart Ops.

When working through the 'Review Summary' section of the DSS, the first step is Labor. In this step, Users can review the names and total hours of the Employees who worked that day, as well as add Employee-specific Log Entries for an Employee's performance.
Once the Labor step is complete, Users should move on to the Deposits step.
This article reviews the following topics:
- Labor Review Step Overview
- Labor Grid
- Employee Labor Detail
- Adding Earnings
- Punch Edits
- Tip Import
- Navigate to the Next Step
Labor Review Step Overview
The Labor Review step of the DSS is an important part of ensuring that Labor Metrics for 'Actual' Labor and estimated Payroll Journal Entries are accurate.
Basic Labor Review
To perform a Basic Labor Review, Users should look at each Employee's daily totals and confirm that they are correct. It is recommended to look at the Hours Worked, Hours Scheduled, and Variance columns for potential missed Punches, as well as unusually long or short shifts. The Basic Labor Review is also an opportunity to enter Employee-specific Log Entries.

Labor Punch Discrepancy - If missed Punches are discovered, they should be corrected in the POS, and the DSS should then be re-imported. The DSS can also be re-imported to resolve any other differences between the POS and R365.
- Note: If you do not have access to re-importing the DSS, add a comment at the bottom of the DSS explaining the reason for requesting that the DSS be re-imported
- Important Note: When the 'Employee Punch Edits' feature is enabled, Employee Punches are required to be edited within the DSS. Any changes to Punches in the POS will not be updated upon re-import to R365.
Employee Log Entry - A Log Entry about the Employee's performance can be entered in the 'Comment' section or via the 'Tell us something we should know...' field below the review steps.
- Note: The Log Entry will be saved for the Employee on the 'Employee Notes' tab of their Employee Record and will be included on the Log Entries page.
- Note: Any Log Entry associated with an Employee who also has access to the DSS form will be hidden from their view
Advanced Labor Review
Depending on the needs of your organization, additional components of the Labor Review can be utilized to increase the accuracy of daily Labor within R365, including:
Labor Rules in R365 can be configured to add penalty Earnings for Rule Violations. If Labor Rules are configured, the penalty Earnings columns should be reviewed during the Labor Review.
Punch Management in R365 allows for adjustment to Employee Punches. When the 'Employee Punch Edits' feature is enabled, Users can edit Employee Punches and Pay Rates directly within the DSS.
- Note: When 'Employee Punch Edits' is enabled, Employee Punches are required to be edited within the DSS. Any changes to punches in the POS will not be updated on re-import to R365.
Tip Management in R365 allows for adjustment to the existing Tips that have been imported from the POS. When the 'Tip Import' feature is enabled, Users have the ability to indicate Tip totals that were already paid in cash or that should be included in paychecks, as well as distribute Tips between all Tipped Employees.
Non-Worked Earnings Management within R365 allows for non-worked Earnings to be added to DSS Labor. When the 'Employee Punch Edits' feature is enabled, Users can enter Earnings that are not associated with the Employee's worked hours. These Earnings might include Vacation, Sick Time, Bereavement, etc. Please contact R365 Support for assistance configuring additional Earning Types.
Starting a Labor Review
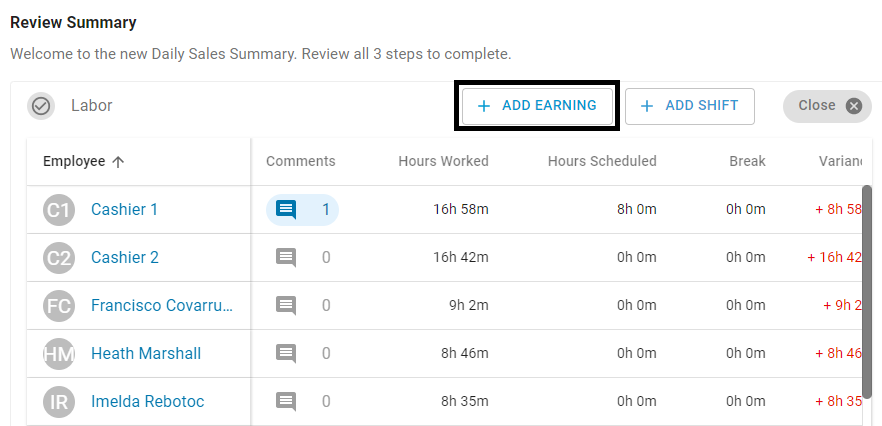
Under the 'Review Summary' section, click '1 Labor' to view a list of all Labor details for the day, including the Employee name, hours worked, break and overtime totals, violations, and tips.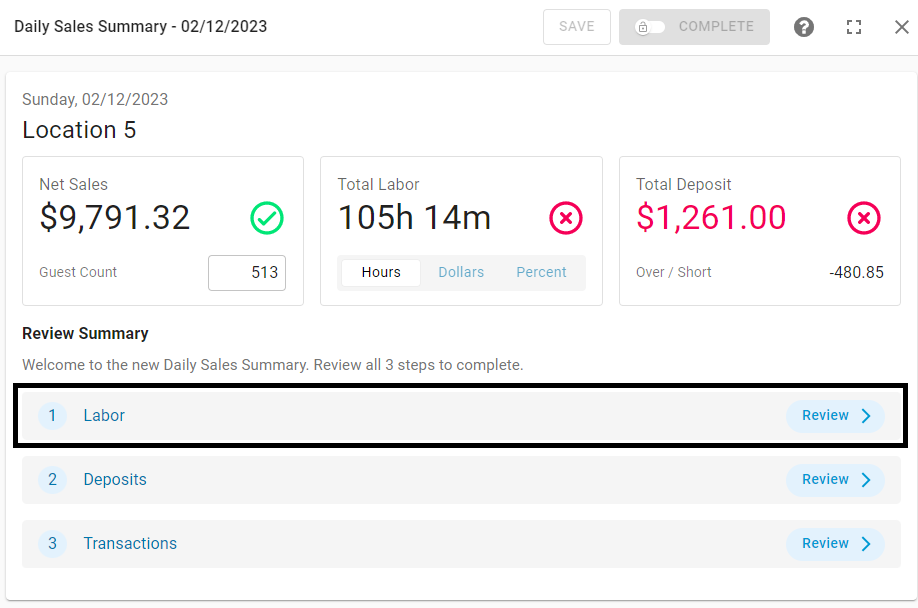
Labor Grid

1) Punch Edit Lock - Indicates if the DSS is locked for editing. When locked, Users will not be able to add Earnings, edit Punches, or import Tips.
- Note: This is only displayed when 'Punch Audit Auto-Lock' is enabled and the grace period for the Pay Period has passed.
2) + Add Earning - Click to add an additional non-worked Earning. Learn more about adding Earnings here.
- Note: This button is only displayed when the 'Employee Punch Edits' feature is enabled.
3) + Add Shift - Click to add an additional Punch for an Employee. Learn more about editing Punches here.
- Note: This button is only displayed when the 'Employee Punch Edits' feature is enabled.
4) Close - Click to close the Labor Review step.
- Note: Once closed, the Labor Review step will be displayed in grey to indicate that it has been reviewed.

5) Employee - Employee name. Click to open the Employee Labor Details in a sidesheet.
6) Labor Detail Columns - The grid contains the following columns:
- Comments - Log Entry Comments for the Employee associated with the DSS Labor Entry
- Hours Worked - Total shift worked based on the Employee's Punches
- Hours Scheduled - Scheduled hours based on the Employee's shifts in the Schedule Calendar
- Break - Break hours based the Employee's Punches
- Variance - Difference between 'Hours Worked' and 'Hours Scheduled'
- Hours Week -Total worked hours for the work week
- OT Day- Overtime hours for the day.
- Note: If the Location's 'Overtime Tracking' setting is set to 'R365 Overtime Rules', daily OT will be calculated by R365 based on the Employee's Punches and the configured Overtime Rules for the Location.
- Note: If the Location's 'Overtime Tracking' setting is set to 'R365 Overtime Rules', daily OT will be calculated by R365 based on the Employee's Punches and the configured Overtime Rules for the Location.
- OT Week- Overtime hours for the work week
- Note: If the Location's 'Overtime Tracking' setting is set to 'R365 Overtime Rules', weekly OT will be calculated by R365 based on the Employee's Punches and the configured Overtime Rules for the Location.
- Note: If the Location's 'Overtime Tracking' setting is set to 'R365 Overtime Rules', weekly OT will be calculated by R365 based on the Employee's Punches and the configured Overtime Rules for the Location.
- Earning Type - Earning Type used for added Earnings. Learn more about adding Earnings here.
- Earning Amount (hours) - Amount of hours added for Earning Types with the entry method 'Hours'. Learn more about adding Earnings here.
- Earning Amount ($) - Amount of dollars added for Earning Types with the entry method 'Cost'. Learn more about adding Earnings here.
- Break Violation - Penalty amount associated with Break Rules violations
- Split Shift Premium - Penalty amount associated with Split Shift and Clopening Rule violations
- Spread of Hours - Penalty amount associated with Spread of Hours Rule violations.
- Reporting Time Pay - Reporting Time amount associated with Reporting Time Pay Rules.
- Tip Makeup - Tip Makeup amount associated with Tip Makeup Rules.
- POS Cash Tips - Cash tips as reported by the POS
- POS Credit Tips - Credit card tips as reported by the POS
- Imported Paid Tips - Tips that have already been paid as reported via a Tip Import.
- Imported Payroll Tips - Tips that still need to be paid as part of Payroll. By default, this amount will be equal to POS Credit Tips, but may be updated via a Tip Import.
7) Tip Template - Click to download the 'Tip Template' for the day. Learn more about Tip Management here.
- Note: This button is only displayed when 'Tip Management' is enabled.
8) Import Tips - Click to upload a completed 'Tip Template'. Learn more about Tip Management here.
- Note: This button is only displayed when 'Tip Management' is enabled.
Each column's total Labor amounts will be calculated in the bottom of the grid.
Employee Labor Details
When an Employee's name is clicked, the associated Employee Labor Details will open as a sidesheet.
Employee Labor Details Sidesheet

1) Employee Name - Click to open the associated Employee Record
2) Scheduled Hours - Total scheduled hours, based on the Employee's shifts in the Schedule Calendar
3) Hours Clocked - Total shift worked, based on the Employee's Punches
4) Variance - Difference between the Scheduled Hours and Hours Clocked
5) Scheduled Hours Details - Shift Details from the Schedule Calendar
6) Punches Details - Actual Punches for the Employee.
- Note: Edit, Delete, and Add Shift are only available if the 'Employee Punch Edits' feature is enabled
7) Daily Tips - Tip details for the Employee
- POS Cash Tips - Cash tips as reported by the POS
- POS Credit Tips - Credit card tips as reported by the POS
- Imported Paid Tips - Tips that have already been paid as reported via a Tip Import.
- Imported Payroll Tips - Tips that still need to be paid as part of Payroll. By default, this amount will be equal to POS Credit Tips, but may be updated via a Tip Import.
8) Other Earnings Detail - Detail for additional Earnings that were manually added to the DSS. Learn more about adding Earnings here.
- Note: The 'Add Earning' button is only displayed if the 'Employee Punch Edits' feature is enabled
9) 'Tell us something we should know...' - Click to create a Log Entry associated with the Employee
10) Log Entries - Any Log Entries added to the DSS for the Employee are displayed here. Click 'Add Comment' to reply to the Log Entry.
Adding Comments
A comment about the Employee's performance can be entered in the 'Comment' section by clicking the 'Tell us something we should know' button.

A Log Entry form will open with the Location, Category, Log Day, and Employee fields already populated. Any Log Entries marked with an 'Employee' Category will be recorded on the corresponding Employee Record. Learn more about creating Log Entries here.

Shifts That Cross Business Days
If an Employee has a Scheduled Shift or Actual Shift that crosses the Business Day for their Location, they will be marked with an alert icon ![]() .
.

The Labor Hours for this shift will be split at the hour when the Business Day changes, and reported on the appropriate day. Opening Labor Details for the Employee will show how the Labor Hours are split.

Punch Edits
When the Employee Punch Edits feature is enabled, additional editing options will be available within the Employee Labor Details sidesheet. Here, Users with the appropriate Permissions can add, edit, or delete Punches.
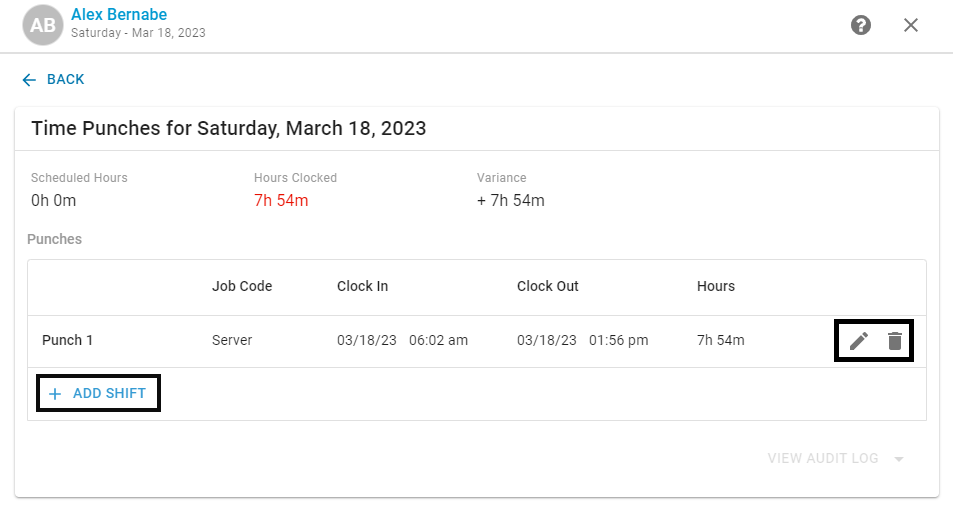
If an Employee does not have any Punches in the POS data, they will not be listed for review. If Punches for a missing Employee need to be added, click the '+ Add Shift' button in the Labor Review step header to select an Employee and add their Punch. Edited punches can be reviewed on the Punch Audit Report. Learn more about editing Punches here.

Punch Edits Auto-Lock
If the Punch Edits Auto-Lock feature is enabled, the Labor Review step will be locked after the close of the Pay Period.

When the Labor Review step is locked, Users will not be able to make edits to Punches, add additional Earnings, or import additional Tips. The Labor Review step can be unlocked by Users with the following Permission:
- Labor → Punch Edits → Lock/Unlock Labor Punches
Learn more about the Punch Edits Auto-Lock feature here.
Adding Non-Worked Earnings
Non-Worked Earnings Management within R365 allows for non-worked Earnings to be added to DSS Labor. When the 'Employee Punch Edits' feature is enabled, Users can enter Earnings that are not associated with the Employee's worked hours. These Earnings might include Vacation, Sick Time, Bereavement, etc.
When the Employee Punch Edits feature is enabled, non-worked Earnings can be added by clicking '+ Add Earning' in the Labor Review header. Learn more about adding Earnings here.
Non-worked Earnings can be viewed, added, edited, and deleted within the Employee Labor Details sidesheet.

The non-worked Earning Types available can be included or excluded from Labor Metrics and Weighted Average Overtime calculations. Please contact R365 Support for assistance configuring additional Earning Types.
Tip Import

Tip Management in R365 allows for adjustment to the existing Tips that have been imported from the POS. Through Tip Import, Users have the ability to indicate Tip totals that were already paid in cash or that should be included in paychecks, as well as distribute Tips between all Tipped Employees.
If Tip Import is enabled, the daily Tip Template can be downloaded, adjusted, and re-imported. Tip Management should be performed after all punches for the day have been confirmed. Learn more about Tip Management here.

- Note: Tips can be imported before or after the DSS Review is completed.
Important Note: If Tips are not imported before Payroll is exported, R365 will assume that Cash Tips have already been paid and that Credit Tips should be paid via Payroll. This will result in 'POS Cash Tips' totals reported as 'Paid Tips', and 'POS Credit Tips' totals reported as 'Payroll Tips'.
Navigate to the Next Step
When all details are correct for a step, Users can navigate out of the step by clicking one of the following:
- The 'Close X' button in the top right corner of the step
- The top ribbon of the step
- Another step
Learn about the next step – the Deposits step.