The Payment Run screen provides a user with a list of approved AP invoices. The user can then apply AP credit memos and discounts, create AP payments, print checks, and produce ACH and positive pay exports for selected invoices. Click here for more information on the Payment Run Overview.
Note: An invoice on the payment run with a payment method other than check or R365 Payments will use the Non-Check # sequence and suffix from the Autonumbering setup screen.
Step 1
Open the payment run and, from the Select Invoices From menu, select one or more legal entities from which the invoices will be paid.

Step 2
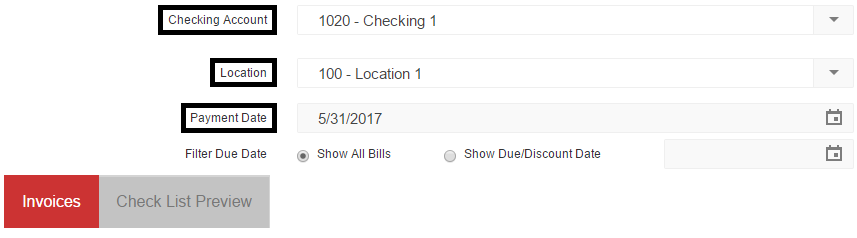
Select the Checking Account that will be used to pay the invoices. The Location field automatically updates to the default location for the selected account. Change the location if necessary. Set the Payment Date that will appear on all payments.
Check Numbering
When the account is selected, the Next Check Number field automatically populates with the next available check number for the account. Check numbering for printed checks in the payment run will start with this number. If needed, the Next Check Number can be changed manually.
Note: When the check number is manually updated, the Next Check Number on the bank account does not update. The next time that the bank account is used, the Next Check Number automatically selects the lowest available check number and skips any previously used check numbers.
The Non-Check # sequence and prefix from the Autonumbering screen are used If an invoice has a payment method other than Check or R365 Payments. If no Non-Check # sequence number has been entered in Autonumbering, a generic text label is used.

- Printed Payments - Once the checking account has been selected, the starting check number for this payment run will be the number in the Next Check Number field.
- Non-Printed Payments - If entering payments that will not be printed, the user has the option of entering text in the Next Check Number field. For example, if the payment method is ACH, the user might note this in the Next Check Number field to indicate that no check number was used for this payment. When text is entered in this field, a message informs the user that payment numbers will not be incremented and will all have the same payment number.
 Note: When using the R365 Payments, a check number of R365 is temporarily assigned. When the payment is processed by the service, this number is usually updated automatically.
All payments created on this payment run will have the same value in the Payment Number field.
Step 3
Filter invoices by priority to help determine the invoices that should be paid first to maximize cash flow.

Step 4
In the Invoices grid, select the checkbox for each invoice to be paid on the payment run.

Step 5
To view further details for one invoice, select the invoice (the line will be highlighted based on the Restaurant365 Theme Builder color. Orange highlight below are related to Contract Price Verification) and open the Detail pane (click the < to open the Detail pane).

1) Check Memo - The first field contains that Default Check Memo, which can be set on the vendor record and will populate this field each time the vendor is paid.
2) Suggested Discount - If this vendor offers a discount for early payment and the payment days fall within the discount date range, the Suggested discount will be listed.
3) Discount Account - Discounts will be recorded in the discount account that is selected, which is also set on the vendor record.
4) Discount Taken - This field does not need to be updated unless the value will be different than the suggested value. Discounts will be automatically applied when available.
Step 6
View and apply any open credits to the invoices being paid. Click here for more information on applying credit memos.
Multiple payments to the same vendor can also be created during one payment run with different payment dates on each payment. This is based on the Payment Date.
If multiple checks need to be created with different payment dates, manually update the Payment Date value in the invoice line that needs the change. All invoices for the same vendor that have the same payment date will go on one check, with separate checks created for payments with other payment dates and/or other vendors.
Step 7
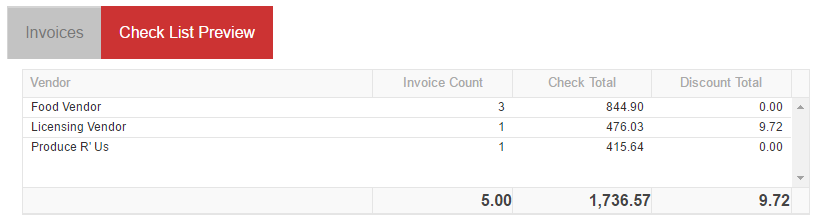
Verify the checks that are about to print under the Check List Preview tab.
Step 8
Submit for approval. Click Submit for Approval to mark this payment run as finalized and ready for higher level Accounting Admin users to view and approve.

Note: If a payment run is not ready to be submitted, it can be saved and later retrieved by opening the Payment Run screen, selecting the saved run in the Saved Run selector, making the necessary changes, and then submitting for approval.

Step 9
Review and approve. From the Payment Runs page, users can then review and approve the payment run. Click here to learn how to review and approve a payment run.
Step 10
Create payments. Open the payment run from the Payment Runs page and click Create Payments.

The payment run opens in a new window where the user can create payments, including R365 Payments, if this feature is enabled.
