A dashboard is a read-only view of Ad Hoc reports where Users can see multiple charts and tables on one page. Anything added to a dashboard is called a Dashlet. Restaurant365 comes with a number of dashboards, and with the proper security level, Users can create their own. The Restaurant365 dashboard list will then be replaced with their own custom dashboard list.
Accessing and Creating Dashboards

To access dashboards, select 'Dashboard' under 'Reports' in the 'Accounting' module in the left hand navigation. The User's default dashboard will load if one has been already set.

To create a new dashboard, with no dashboard selected in the Dashboard drop-down, you will see a 'Create Dashboard' button in the top, right side of the Dashboard form.
Pressing this button will open a new browser tab with the Dashboard Designer.
Editing Dashboards

To edit an existing dashboard, first select a dashboard in the Dashboard drop-down, and you will see the 'Edit Dashboard' button in the top, right side of the Dashboard form. This will open a new browser tab with the Dashboard Designer.
When editing an existing, you can remove dashlets by right clicking the dashlet and selecting Delete. Dashlets can be moved around the page by dragging and dropping (holding down left mouse button, moving around the page, and then releasing the left mouse button).

As you move it around the page, sections will highlight in yellow to show how much space it will take up and where exactly it will fit in the page. To add additional dashlets to the report, drag them on from the Existing Content section of the left-hand pane. Learn more about creating charts/reports that will show in the Existing Content section here.
Once dashlets are locked in place on the dashboard, they can be manually re-sized. To do this, click the desired dashlet, which will highlight it in red, and then put the mouse over the red edge of the dashlet. The mouse pointer will turn into 2 arrows where you can adjust the size to make it larger or smaller by holding the left mouse button down and dragging the edge of the dashlet. Once at the desired size, release the left mouse button and the dashlet will lock into place at its new size.
Saving Dashboards

The most important factor when saving a dashboard is where you choose to save it because this impacts the security level of who can see it. When ready to save, press the Save disk icon and a drop-down will appear. If creating a new dashboard only, a 'Save Dashboard' option is available, but if editing an existing dashboard, you will also have a 2nd option to 'Save Dashboard As...'.
If editing, selecting 'Save Dashboard' will overwrite the existing dashboard whereas 'Save Dashboard As' will allow you to give a new name for your dashboard and leave the original dashboard unmodified.
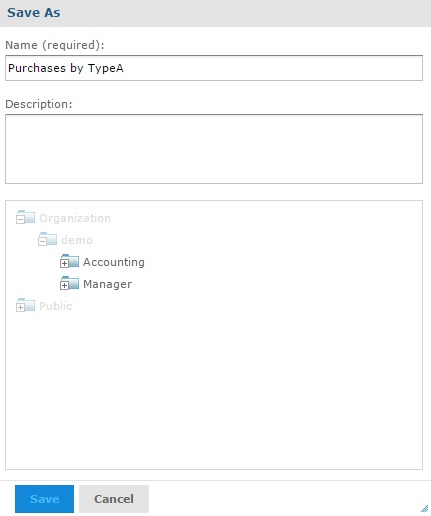
Once you select a save option, the 'Save As' window will pop up where you can set the name of the dashboard and choose where to save it. Once you've typed the name, click the Organization folder in the folder hierarchy below, which will expand to show your site folder. The example site name is 'demo' here.
- Note: These folders will appear grayed out but are still clickable and will open to the correct site folder.
Click your site folder, which will expand to the 'Accounting' and 'Manager' folders, and select the one where your dashboard will be saved. Saving in 'Accounting' means only Users with the Accounting Manager role will be able to see it while saving in 'Manager' means Users with either the Restaurant Manager or Accounting Manager role will be able to see it.