The Menu Item record is automatically created once the POS Integration has been completed. R365 will automatically import each Menu Item that appears in your POS. Similar to the relationship between Employees and POS Employees, a Menu Item and a Menu Item Link will be created for each Menu Item that appears on each POS that is integrated with R365.
- Menu Items - Allows the User to set the details for each Menu Item including: Display Name, Estimated Cost, Price, Target Margin, etc.
- Menu Item Links - Allows the User to link together more than one Menu Item. This is especially helpful when a Menu Item has a different name (in the POS) at each Location
Click here for more information on mapping Recipes to Menu Items.
Review Menu Items

To review your Menu Items, first, navigate to Smart Ops, then click 'Menu Items' under 'Sales & Forecasting' in the Operations module to load the Menu Items list.
To open a Menu Item Record, double click the Menu Item name in the Menu Item List.
Menu Item Record

1) Name - The Menu Item Name, as it appears in your POS System, will be populated in this field
2) Recipe - The Recipe that will be directly associated with this Menu Item. Linking Recipes and Menu Items allows you to calculate theoretical usage and quantity on hand
3) POS Menu ID - The Menu ID within the Point of Sales System
4) Barcode - The barcode for the item
5) Entree toggle - Toggle to 'Yes' if the Menu Item is a Entrée. This will allow for filtering on various reports and on the Menu Item list
6) Target Profit % - The Target Profit % for the Menu Item. Informational only
7) Estimated Cost - The Estimated Cost for the Menu Item. Informational only
8) Estimated Price - The Estimated Price for the Menu Item. Informational only
9) Menu Item Categories - Create and assign Menu Item Categories 1 through 3. Menu Item Categories are very useful in performing reports on your Menu Items. Click here for more information on Menu Item Categories
- Note: Menu Item Categories are different from Item Categories
Menu Item List
For Users that want to keep their Menu Item list in order, we recommend using the Menu Item Categories and creating a saved view for the Menu Item list. The User could set the filters to only include the categories that they want to see, or specifically exclude the categories they do not want to see, such as 'NOT MENU ITEM'.
By assigning Menu Item Categories to your Menu Items, you will gain additional filtering capabilities in your reporting, as well as on the Menu Item list. The Category hierarchy could use the following example categories:
- Category 1 (Broad):
- Food
- Liquor
- Beer
- Wine
- N/A Beverage
- Desserts
- NOT MENU ITEM
- etc.
- Category 2 (Menu Headers):
- Entrees
- Appetizers
- Bottled Beer
- Draft Beer
- etc.
- Category 3 (Detailed):
- Mod/Add/No
- Craft
- Domestic
- Import
- etc.

Review Menu Item Links

Menu Item Links allow the User to link together more than one POS item to one R365 Menu Item. This is especially helpful when the Menu Item has a different name in the POS at each Location. To review your Menu Item Links, click 'Menu Item Links' under 'Sales & Forecasting' in Smart Ops to load the Menu Items Links list.
To open the Menu Item Link Record, double click the Menu Item Link name from the Menu Item Links list.
Menu Item Link Record

- By default, each Menu Item will have a Menu Item Link that is automatically linked to it upon creation
- The 'POS Name' field cannot be edited, while the 'Menu Item' selector will allow you to point the Menu Item Link to a different Menu Item if necessary
- The 'Not Menu Item' checkbox allows you to exclude this Menu Item Link from the Menu Item Mix report. Non-menu items, such as tax, tip, service fee etc. can be excluded to show you data on just your menu item performance
Linking Multiple Menu Item Links to a Single Menu Item
In this example we have two Menu items that are the same but have different names. We will link the two POS Menu Items to a single R365 Menu Item. Linking the two items together will give you a more accurate view of the Menu Item Performance across Locations.

- Decide which Menu Item (not Link) will be the main record for reporting purposes
- Open the Menu Item Link that is connected to the Menu Item you will not be keeping
- Click on the ‘Menu Item’ selector and select the Menu Item you decided on in step 1
- Save the Menu Item Link record


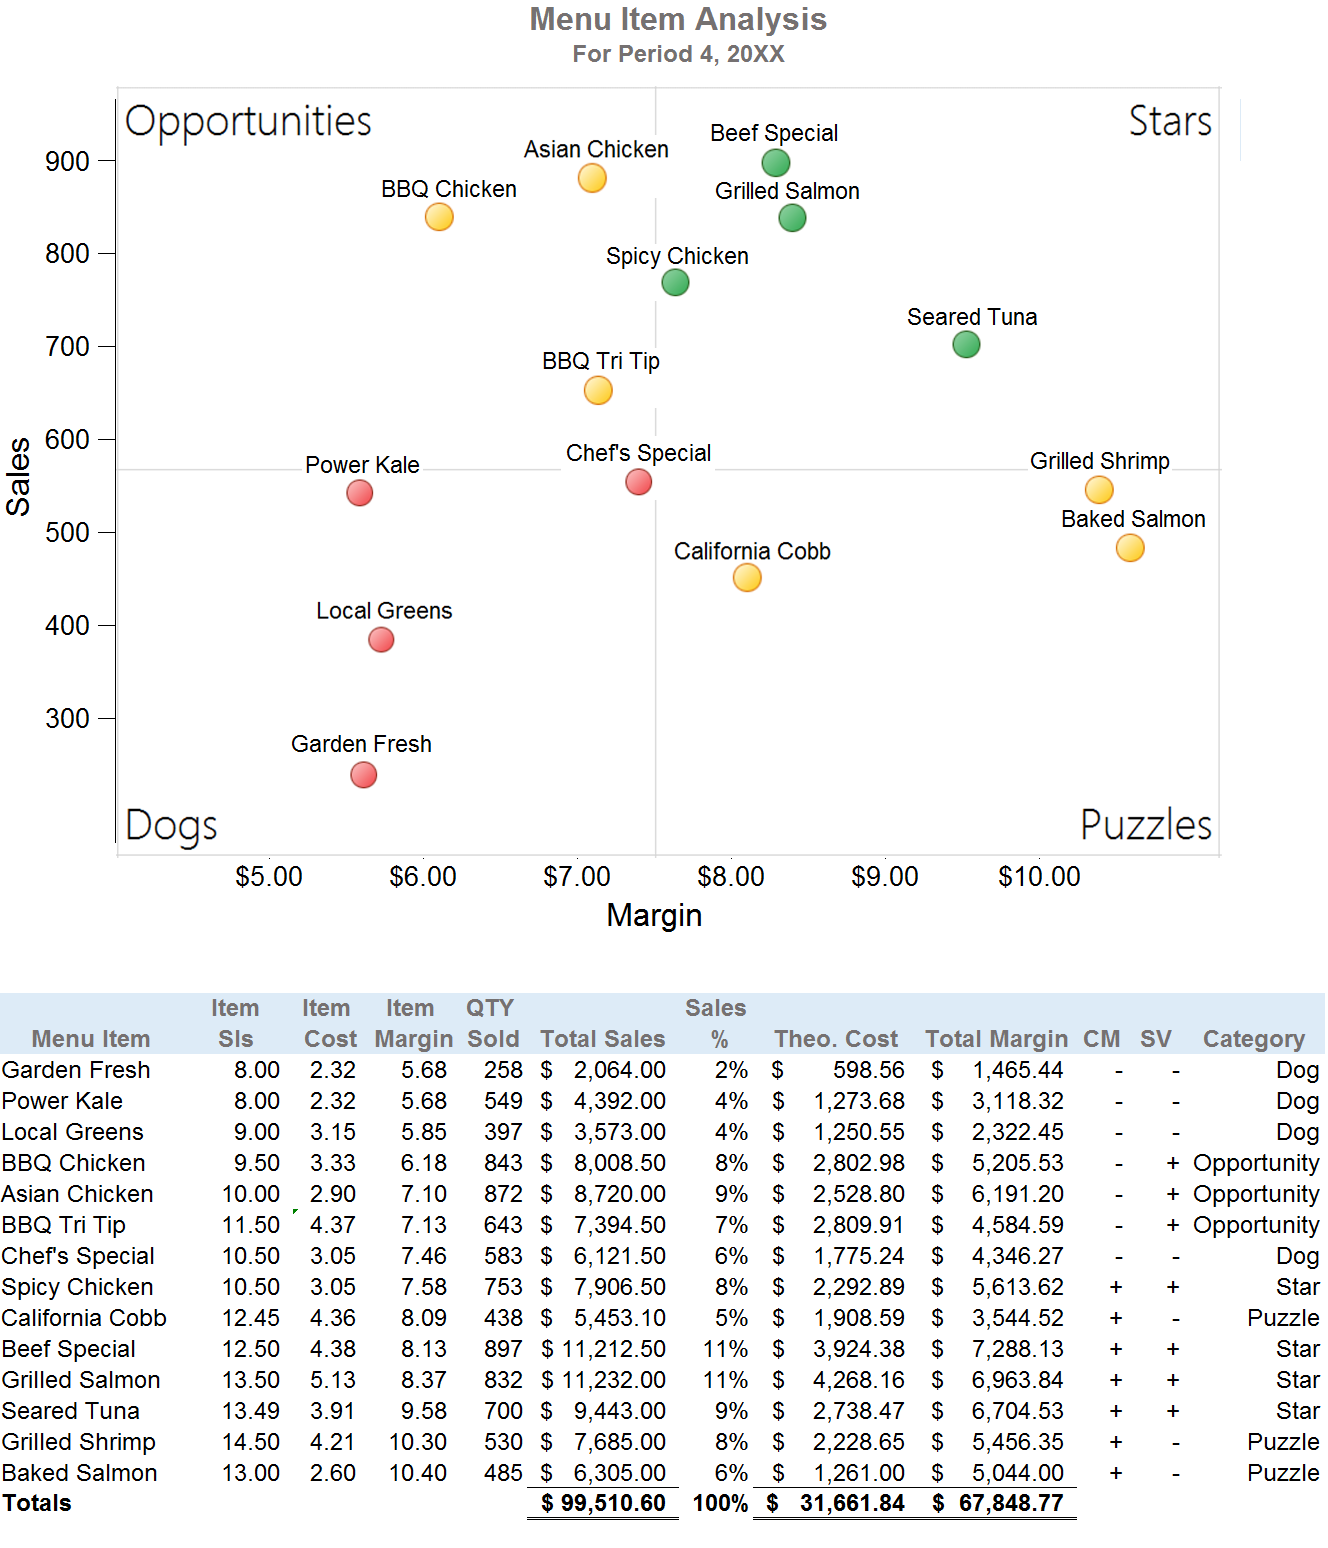
Menu Item Analysis
- Visually review the performance of each menu item with ease
- Analyze menu items with greater efficiency
- Easily see where you are doing well and where you can improve
Menu Item Reporting
A few reports exist to calculate and analyze recipe costs and more reports are added often. Two primary reports used in this module are the ’Menu Item Analysis’ and the ‘Menu Price Analysis’ Reports.