
R365 and Paycom have teamed up to create a payroll integration that will automate the following processes:
- R365 will electronically deliver Employee Punch Data, which has imported from your POS systems to Paycom with a single click
- When payroll processing is complete, Paycom will automatically export the Payroll Journal Entry based on a schedule set within Paycom. All exported files will be automatically imported in to R365
- Labor Data will be brought in from Paycom and other Labor Providers (Deputy, 7Shifts, Harri, and Dolce currently) as part of our DSS process. To initiate this service, complete the following:
- Request the Labor feed from your Paycom Account Representative and have it sent via FTP
- Submit a Support Ticket requesting the POS team to set up your specific Labor Provider. View an example of the Paycom Labor Import format here
Note: While R365 provides this service for no additional charge, please make sure to verify any service fees with Paycom before proceeding.
Important Note
Paycom can only import up to 15,000 punches per 24 hour period and has a maximum of 2,000 punches per import with a cool down rate of 60 seconds. Therefore, if more than 2,000 punches need to be imported, split them up into a couple of batches so as to avoid a time out error and allow for more successful imports.
Getting Started
To take advantage of this functionality, the following conditions must be met:
- Client must have an active POS Integration in R365. 'POS Import Type' must be set to 'Sales & Labor'. Refer to the Location record for more information on POS Import Types
- Client must have an active Paycom SFTP account. Please contact Paycom if you need additional information about the Paycom SFTP service
- Client must provide R365 with the Paycom SFTP credentials (username and password)
- Client must request services to be turned on within Paycom and request a Paycom API token. Reach out to your Paycom Rep to request an API token and to setup a 'Push Reporting Group'
- Client must provide R365 with the Paycom API Token and SID
- Client provides R365 Supportwith the following:
- Paycom SFTP Username and Password
- Paycom API Token and SID
- Client must setup Paycom’s Department/Allocation settings in R365 (see 'Setting up Department/Allocation Settings' below)
- Paycom Data (i.e., Job codes, employee ID’s, GL Accounts, Location Numbers) must be identical to R365 Data
- Client must have GL Codes mapped in Paycom
- To send payroll punch data, R365 user must have either 'Accounting Manager’ or 'Accounting Clerk' Role assigned. Click here for more information on R365 Security Roles
- When all settings are in place and R365 Support has closed the ticket where the SFTP Credentials and API Token and SID were provided, punches can be sent to Paycom using APS Payroll Connect
Setting up Department/Allocation Settings
Client must verify setup of Paycom’s custom Department/Allocation settings in R365. Complete the following steps to confirm your Department/Allocation Settings in R365:
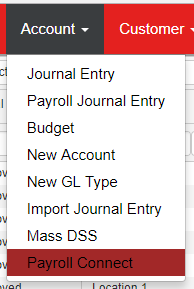
- Within R365, hover over the ‘Account’ menu and select ‘Payroll Connect’ to open the Payroll Connect prompt

- Within the Payroll Connect prompt, first select 'Paycom' then click on the ‘Advanced Setup’ icon (shaped like a gear)
- On the Advanced Setup page, use the ‘Location Number’ and ‘Job Code’ drop-down selectors to map both fields to your Paycom setup. Most clients will map the Location Number as the Department Code. The 'Payroll Profile ID' drop-down selector will only need to be adjusted if your Payroll Profile was set up within Paycom. If not, then do not update this field.
- Note: If you are unsure of the Paycom Setup settings, work with your Paycom representative.

- Note: If you are unsure of the Paycom Setup settings, work with your Paycom representative.
- Finally, navigate to each of your R365 Location records that you are wanting to push Labor data from and update the Payroll Location ID field on the 'Labor Estimates' tab.


Matching Data Values in R365 and Paycom
Paycom Data (e.g., Job codes, employee ID’s, GL Accounts, Location Numbers) must be identical to R365. The following table can be used to help clarify what fields are labeled in each system:
| # | R365 Fields | Paycom Fields |
|---|---|---|
| 1 | Payroll ID (exe A016) | Employee Code |
| 2 | Location Number (Laguna = 1, Miramar = 5, etc.) | Department Code (Usually Location number) (Laguna = 1, Miramar = 5, etc.) |
| 3 | Job Code (Break = 5, Cook = 4, Cashier = 101, etc.) | Labor Allocation (Break = 5, Cook = 4, Cashier = 101, etc.) |
| 4 | GL Account Number | GL Code |
- The Payroll ID/Employee Code is setup in the POS. R365 pulls whatever is setup in the POS, so if changes need to be made, they should be updated in the POS. Different POS systems have different names for the Payroll ID (Exe. External ID). Please be sure to NOT change the POSID, as this will create duplicate employees in R365. The end goal is to have the Payroll ID/Employee ID, match in all three systems
- If Location Numbers do not match, please work with your Paycom Representative. Changing R365 Location numbers may result in issues with Vendor integrations
- If Job Codes do not match, we recommend creating new Job Codes in Paycom. Please work your Paycom Representative for assistance
- GL Account Numbers/GL Codes and mappings can be updated in Paycom. R365 GL accounts cannot be marked as disabled, or be a Parent Account. Accounts much match exactly including trailing zeros
Send punch details to Paycom:
- In R365 hover over the ‘Account’ menu and select ‘Payroll Connect’ to open the Payroll Connect prompt
- Choose ‘Paycom’ as the Payroll System
- Enter the Start and End Dates, choose the Locations, then click ‘Send Payroll Data’
- A confirmation dialog box will confirm success of transmitting the data to Paycom or will provide an error message with suggested next steps.

Receive Journal Entries from Paycom:
- Paycom will automatically save a Journal Entry template to a secure FTP folder
- R365 will check the FTP folder every 15 min for new files and import them as an unapproved Payroll Journal Entry
- If the JE import seems to not be working, please ask your Paycom Representative to verify the JE file being saved in the FTP folder, and email it to R365 Support so it can be reviewed
- If the file was saved in the FTP folder and was not imported, an error file will be created with which specific GL accounts did not match / do not exist