This article is part of the Classic Manager Log module training. Click here for more information on the Classic Manager Log module
Task Lists are User-created lists that can be put to use manually or scheduled for regular reoccurring use. Task Lists can be assigned to a Location or set of Locations. Uncompleted tasks can be auto-closed as ‘Incomplete’. Tasks cannot be deleted from a Location once they have been assigned to that location for that day.
Security
The Permissions listed here are associated with Punch Edits. These Permissions can be added to Custom User Roles or single Users. Learn more about managing Permissions and Custom User Roles here.
Punch Edit Permissions are found in the Permission Tree as follows:
- Manager Log Classic
- Task List Setups
- View Task List Setups
- Edit Task List Setups
- Create Task List Setups
- Delete Task List Setups
- Task List Setups
The Permission Access report can be used to determine which User Roles or Users already have these Permissions assigned.
Learn more about User Setup and Security here.

Once Task Lists are created, they can be found by clicking 'Task List Setup' under 'Administration' in the 'Manager Log' module. Three 'placeholder' Task Lists will be present in the list. These can be deleted if necessary by selecting 'Delete' on the Save menu. Double-click on a record to open and update the Task List.
Create a Task List
Hover over the 'Mgr Log' menu and select 'Task List Setup' to open the Task List form.
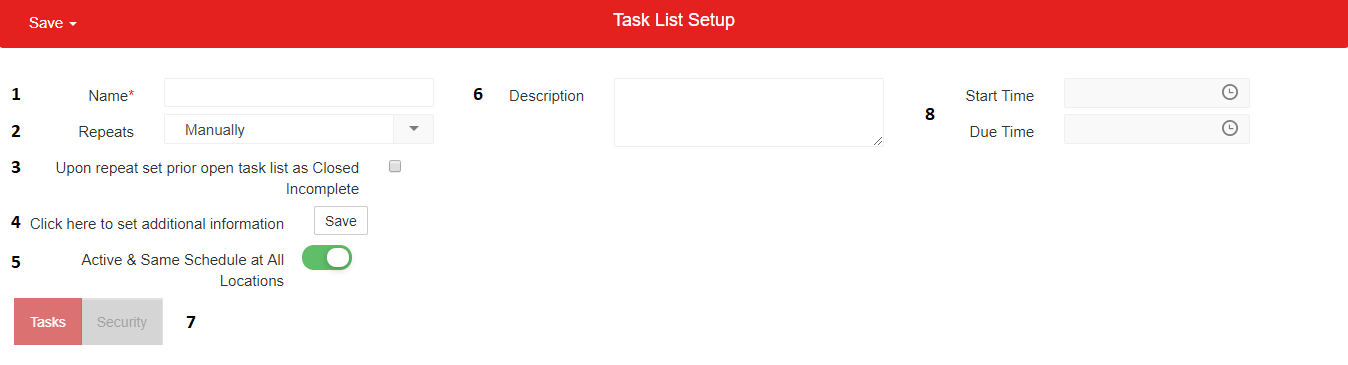
1) Name - The display name of the Task List
2) Repeat Schedule - A Repeat Schedule for the list. If the list will only be used Manually, leave the default option, 'Manually', set. Repeat Schedules function in the background of R365 to create the Task List based on the selected Repeat Schedule, Start Time, and Due Time. Repeated Task Lists will be generated the night before the start of the next Task List Cycle.
- Note: If the night before the start of the next cycle has already passed, then the Repeat will not happen until the following cycle. A good example of this is the ‘Period’ repeat schedule. If we select to have this Task List repeat each period, but we are already in the middle of the current period, R365 will not automatically create this task list for us for the Current Period. The reason being that the night before the start of the next cycle, the current period, has already passed. We would need to create this Task List via ‘Use Manual Task List’ in the Mgr Log menu in the top ribbon
Repeat Schedule options include:
- Daily - repeats every day
- Weekly - when selected you can choose which day, or days, that this task list will repeat on by clicking the day name

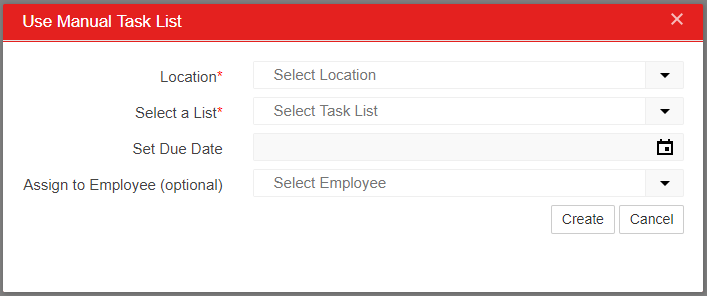
- Manually - this Task List will be initiated via the 'Mgr Log' menu by selecting 'Use Manual Task List'
- Period*
- Monthly*
- Quarterly*
- Yearly*
- * Note: The 'Date Occurrence' must be selected from one of these three options:
- First Day
- Last Day
- Same Day
- * Note: The 'Date Occurrence' must be selected from one of these three options:
3) Auto-Close Incomplete checkbox - This checkbox is used in conjunction with Repeat Schedules. This setting will automatically close any open tasks when the next cycle starts. These system-closed tasks will be marked as ‘Closed – Incomplete’. This will save our Restaurant Manager from being bogged down by numerous past due tasks that can no longer be completed
- Note: A good example of this would be the daily task 'Scrape Grill'. If it is Friday and the daily 'Scrape Grill' task from Tuesday was never completed, it doesn't help your Managers to have tasks that can no longer be completed filling up their task lists
4) Preliminary Save - This save button is here for a preliminary save after the other header fields have been completed. Notice how the 'Tasks' and 'Security' tabs are grayed out and inaccessible. Once we click this save button, the button will disappear and we'll have access to those tabs and settings
5) Active / Schedule for All Locations - Set if the Task List will be active and have the same repeat schedule at all Locations. Clicking 'No' (red) makes the 'Active Locations' tab appear
6) Description - Enter a description for the Task List
7) Task & Security Tabs - These settings appear after the other settings have been entered and the Save button (4) has been clicked
8) Start & Due Time - Select the 'Start Time' and 'Due Time' for the Task List. 'Start Time' will determine when the Task List is created (per the Repeat Schedule) while 'Due Time' will determine if and when the Tasks are 'Overdue'
- Note: These times are set on the same day
Default Task List

Restaurant365 includes the default Task List of 'Health and Sanitation' in every database as a way to promote faster setup when creating Tasks Lists unique to your restaurant.
This default Task List provides a framework for ensuring the health of your Employees and the sanitation of your restaurant. While this is auto-generated, it can be used as an example for creating other Task Lists and can be modified to better fit your current restaurant procedures.

After activating the Default Log Category, Manager Log Admins can then activate this Default Task List by toggling the 'Active & Same Schedule at All Locations' toggle.
Active Locations / Custom Repeat Schedule Tab
The Task List can be toggled to 'Active & Same Schedule at All Locations' in the Task List Setup form. However, if the Task List needs to be set up for certain Locations, or if the Repeat Schedules need to be custom, you can set those settings on this tab.

Toggle each 'Log Active' to enable the Log at each Location. Once enabled, you can set a Custom Repeat Schedule by toggling that switch on. Fill out the prompt then save to set the custom schedule.
Security Tab

Similar to Log Categories, this setting allows which Employee Job Titles can use and complete tasks in this Task List. The default setting is 'All Jobs'. If deselected, the 'Jobs without Access' and 'Jobs with Access' panels will appear on the 'Security' tab. Each Job Title with Access will need to be manually selected in order to use this Task List.
Tasks Tab
This tab is where you create each of the Tasks that will be part of the Task List. At first glance, there are not Tasks and all that we see is a 'New Entry' button.
![]()
Click the 'New Entry' button to open the entry prompt, where you choose which type of Task Entry to create.
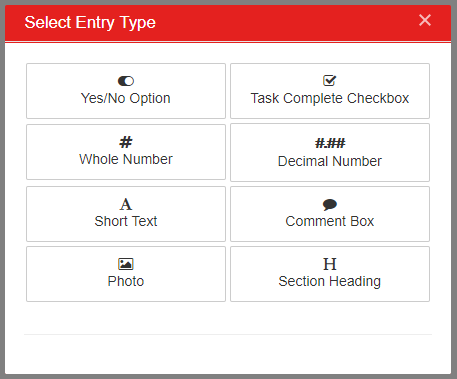
Options include:
- Yes / No Toggle
- Completed Checkbox
- Whole Number field (with goal and tolerance)
- Decimal Number field (with goal and tolerance)
- Short Text (single line)
- Comment Box (multiple line)
- Upload a Photo
- Section Heading (used for structure of the Task List)
Task Setup Prompt
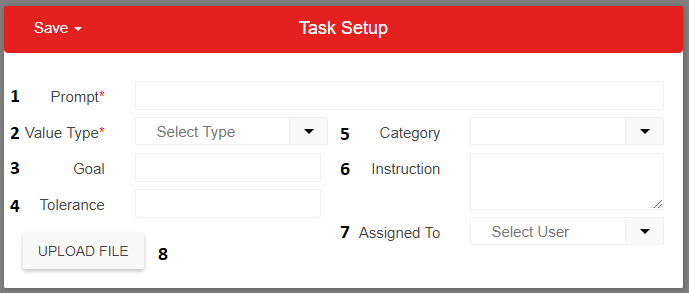
1) Prompt - Enter the Task Prompt as it will be displayed to your Employees on the Task List
2) Value Type - This is set when you click on the Entry Type
3) Goal* - See below
4) Tolerance* - See below
5) Category - Optionally assign a Log Category
6) Instruction - Add any additional instructions to the task. If present, an 'information icon' will be present on the task line. User can hover over the icon to view the instructions in a tool tip, or click on the icon to view them in a popup
7) Assigned To - Optionally assign the Task to a specific User / Employee
8) Upload File - Upload an attachment to the Task. Attachments will appear as paperclips on the task line
*Goal and Tolerance

Whole Number and Decimal Number task response criteria include two optional fields on the Task Setup prompt. ‘Goal’ represents the desired whole or decimal number goal for the task while ‘Tolerance’ represents the acceptable or tolerable variance from the goal. Any value that falls outside (plus or minus) of the ‘Tolerance’ value will result in the Task being automatically flagged for additional follow up.
Task lists that contain any flagged entries will be flagged on the Daily Overview page and the Task Lists view. Individual flagged entries will be listed for review on the Flagged Entries View.
Re-order Tasks and Headings

Task and Section Headings can be reordered as needed by clicking and dragging the line item to the desired sorting order. When all tasks have been added and the desired Task Order is in place, save and close the Task List Setup. The Task List is now ready to use!