This article is part of R365's Commissary feature.

Utilizing the Commissary feature in Restaurant365 enables external customers to create commissary orders from within the Commissary Customer Portal. This portal functionality is part of the Commissary feature and is included in the cost of the Commissary feature.
Contact your CSM or R365 Support to learn how the Commissary module can enhance your R365 experience!
TABLE OF CONTENTS
- Commissary Customer Portal Setup
- Adding a Customer as an Ordering Location
- Customer Portal
- Create a Commissary Order
- Submit a Commissary Order
Commissary Customer Portal Setup

To enable the use of the commissary customer portal, customer records must be created for each customer that will be accessing the system and creating commissary orders. Each customer record will also need to have portal access granted to them on the customer record.
To create a new customer record, please follow the steps outlined in the customer record training article. Make sure to include all relevant customer-specific information on the General tab of the customer record as these details will be utilized when creating AR invoices for the customer going forward.
Enable Customer Access
To enable portal access, on the customer record navigate to the Customer Additional Info tab. Check the 'Commissary Customer' checkbox and the 'Commissary Info' tab will become visible.

Navigate to the Commissary Info tab and select the designated Commissary Location for this Customer. All orders made by this customer will originate from the commissary location that is selected in this field.
- Note: If a commissary location has not previously been created, it is recommended that a new Location record be created to represent the commissary. If each location will act as a commissary to external customers, the representing location can be selected as the commissary for this customer.
Check the Portal Access checkbox and provide the email address that the customer will use to login to the customer portal as well as receive commissary order notifications. Prior to clicking the Reset Password button, Save the Customer record, then click the Reset Password button.

Commissary customers will then receive an invitation email with their username (email) and temporary password.

The user will be prompted to change their password upon first login.

Adding a Customer as an Ordering Location
Before a commissary customer can create a commissary order, the customer must be added as a commissary ordering location.

Customer Portal
Upon first login, the commissary customer will not have any commissary orders. Limited actions will be available on the customer portal.

| Field | Description | |
 | Commissary Orders | This page lists all Commissary Orders. Here, users will be able to open records to view/change them as needed as well as create new commissary orders. |
 | Fulfilled Transactions | This page lists all Fulfilled Transactions. Here, users will be able to open records to view/change them as needed. |
 | Commissary AR Invoices | Lists all Commissary AR Invoices. Users will be able to open records to view/change them as needed. |
 | Create | Click to create a new commissary order. Note: Users will not be able to create commissary orders until the customer has been added as an ordering location. If the customer has not yet been added as an ordering location, the commissary customer will receive the following notice:  |
 | Username Menu | Click to manage the user portal access password. |
Create a Commissary Order
To create a Commissary Order, Click the +Create button on the Commissary Orders page.

This action will open the Commissary Order Form where the customer will be able to set the order date and the quantities of available commissary items.
- Note: The Location, Delivery Day, and Customer fields will all be locked for Commissary Customers as these values are set on the customer's Ordering Location record.

Submit a Commissary Order
After the customer selects the desired order date and updates the quantities for the order, they have the option of saving, submitting, or canceling the order via the Save menu in the top ribbon.
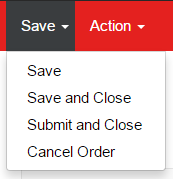
- Save - This will save the order without submitting.
- Save and Close - This will save the order without submitting and closes the order form window.
- Submit and Close - This submits the commissary order to the commissary location. Submitted orders can only be changed if they have not been locked by the commissary. Once a submitted order has been locked, it cannot be changed.
- Cancel Order - This will notify the commissary that the order has been canceled by the customer.