This article is part of Task Management and covers creating a new task Guide.
A Guide must be built in order to add tasks to the My Tasks page. As users create Guides, they will build and customize tasks for the guide.
Once a guide is created, users can assign the guide to a location. All task groups and their associated tasks on the Guide will then appear on the My Tasks page for the assigned location(s). Users can assign multiple guides to one location. One guide can also be assigned to more than one location.
Users can create brand new guides from scratch or by duplicating an existing guide.
This article covers the following topics:
- Creating a New Guide
- Duplicating an Existing Guide
- Open Guide
- New Task Form
- Creating Tasks
- Editing Tasks
- Task Groups
Note: Task Management is an add-on to Operations. Please contact your Sales Representative to learn how the Task Management add-on can enhance your R365 experience.
Creating a New Guide
To create a new Guide, click the +Add Guide button  in the top right corner of the Guides page.

Users will be prompted to give the new Guide a name.
- Note: The name given to the guide is for sorting purposes on the Guides page only. This name does not appear on the My Tasks page.
Once Done is clicked, a new guide will open. Once a new guide is open, users can begin building tasks and task groups.

Duplicating an Existing Guide
Users can also create a new guide by duplicating an existing guide. Duplicating existing guides is a feature that may be helpful for users that would like to recreate a specific guide with only a few minor adjustments.
There are two ways to begin duplicating a guide. Users can duplicate a guide from an open guide or from the guide menu on the grid.
 | From the Guides grid, click the guide action menu  for the guide that needs to be duplicated. for the guide that needs to be duplicated.From an open guide, click the guide menu  in the top right corner. in the top right corner. | Guides Grid Open Guide  | |
 | From the dropdown, select the Duplicate Guide option. | ||
 | Users will be prompted to enter the new guide's information. | 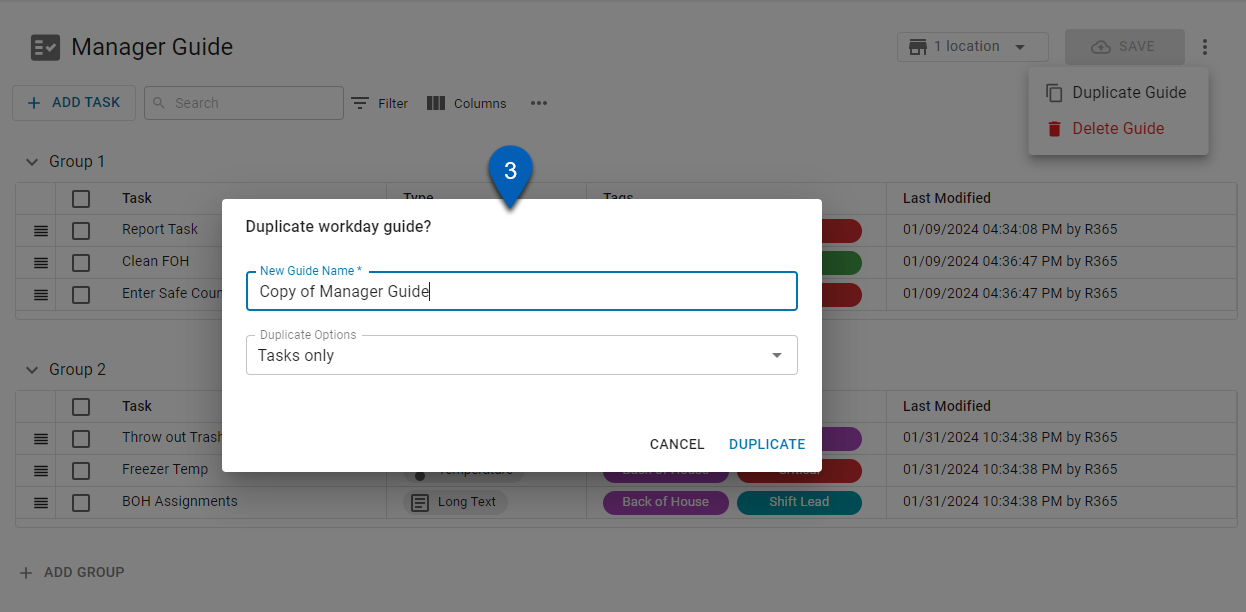 | |
 | Enter a name for the new guide. |  | |
 | Select what parts of the guide to duplicate. Users can choose either of the following:
| ||
 | Once the selections have been made, click Duplicate. |  | |
 | The page will reload to the new guide, where users can make edits and changes as needed. |  |
Open Guide
New guides will have 2 default groups labeled Group 1 and 2, and there will be 6 tasks labeled Task 1-6. From this page, users can edit, create, and manage tasks.

| Field | Description | |
 | Task List Icon | Hovering over this icon will show users a back button. Click this button to return to the guides list. will show users a back button. Click this button to return to the guides list. |
 | Guide Name | The name given to the guide. This can be changed by clicking the field over the text and editing the entry. |
 | Location Selector | The selected guide will be assigned to the locations that users select from this dropdown. |
 | Save | Saves any changes made to the guide. The save button will be enabled any time there is a change made to the guide. |
 | Option Menu | Shows menu options including options to duplicate or delete the guide. |
 | + Add Task | Creates a new task by opening a task sheet. To read more about building a new task, click here. |
 | Grid Functions | As with most smart grids, the grid when creating a guide has the following functions:
|
 | Task Group | Indicates a different set of tasks. When the guide is assigned to a location, the task groups, including the task group name and the associated tasks, will appear the same way on the My Tasks page. Users will see the name of the task group followed by the number of tasks completed. Users can click the arrow icon  to expand or collapse the group. to expand or collapse the group.Task Group Name In-Field Editing Click the task group name will allow users to edit the group name.  Task Group Function Menu Click the task group menu icon  to open the task group menu options, which allow users to do the following: to open the task group menu options, which allow users to do the following:
 |
 | Task List | Indicates the start of a task list in a group. Each task list has the following columns:
|
 | Task | A created task. From a task entry, users can do the following:
|
 | + Add Task | Adds an in-line task. Adding tasks in-grid allows users to quickly create multiple tasks. Users can then return to the task to add details. When adding a task in-line, users can press the SHIFT and ENTER keys together to quickly add another in-line task.  |
 | +Add Group | Adds a new task group. Once a new task group is added, it can be renamed, and tasks can be added to it. |
 - Searches the grid for keywords.
 - Filters the grid to fit specific criteria.
 - Show, hide, or rearrange columns.
 - Changes row height to be smaller or larger. Found in the menu dropdown.
 - Exports the grid to a .csv file. Found in the menu dropdown.
 - Refreshes the data in the grid. Found in the menu dropdown.
 to move the task to another task group
 to select the task and open the bulk edit options
New Task Form
When the +Add Task button  is clicked, users will be prompted to complete the Create a new task form.

| Field | Description | |
| Task Name | Click and enter a name into the field. The name of the task should be a short descriptor of that action that needs to be taken. Ex.: Complete Inventory Count |
| Task Type Selector | Click to open the dropdown selector and choose the type of task. The task type will determine the requirements for completing the task, and where the user will be guided to when using the task’s shortcut button. Users can select from R365 Actions, R365 Reports, or various other task types. Read more about the different Task Types, here. |
 | Add Shortcut | If necessary, users can click this button to add a shortcut to the task. Adding a shortcut may be necessary if the task requires users to visit another site or another R365 page to complete the task. When a shortcut is added, the link to the new page/site will be available for the User who completes the Task.
Note: Record task types have a shortcut automatically included as part of the record requirement set up |
 | Assignee | The user(s) assigned to the task. The individual(s) listed here are responsible for the task. When the guide is saved, the user(s) added here are notified of the task assignment. |
 | Require Attachment Toggle | Toggle the Attachment Required toggle to require users that complete the task to upload an attachment before completing. |
 | Timeline | Click the Timeline field to set the frequency for how often this task should show in My Tasks. This will prompt a pop-out box for users to complete. When selecting the task occurrence, users will need to complete the following fields:
|
 | Task Availability | Select when the task is made available or unavailable. When a task is unavailable, it appears greyed out on the My Tasks page and cannot be opened or accessed in any way. Tasks that are available but not due on the selected day will show up in the upcoming section of the My Tasks page. When selecting availability, users must select the following:
Note: Availability settings do not apply to users with Task Management admin permissions. Task Management admins can mark a task as complete at any time. |
 | Tags | Click the dropdown to add tags. Tags can be added for categorization purposes. Users can select an existing tag from the dropdown or type in a new tag and select + Create new tag for '[tag name].' From this dropdown, users can also open the Task Management settings sidesheet by clicking Manage Tags. |
 | Descriptions | Enter a description of the task. In this textbox, users can enter instructions for how the task should be completed or what might be expected of employees. |
 | Attachments | Click the add attachment button to the task. Users may choose to upload instructions, pictures, or any other files related to the task. |
 | Cancel | Click to cancel the creation and close the pop-out box. When this button is clicked, any changes to the form will not be saved. |
 | Create Buttons | Click one of the create buttons to save the task. Click the Create & Add Another button  to save the current task and promptly open a new task form. to save the current task and promptly open a new task form.Click the Create Task button  to save the Task and close out the form. to save the Task and close out the form. |


 Repeat By - Select whether to repeat by days, weeks, months, or year.


Creating Tasks
Users can create as many tasks as needed to add to any guide. To build a new task, first click the +Add Task button . This will open the new task form where users should enter the following task details:
- Task Name
- Task Type
- Attachment requirement
- Timeline
- Availability
- Tags (optional)
- Add Shortcut (optional)
- Description (optional)
All the details entered will be visible to users when the task is opened to view on the My Tasks page.
Once the task details are entered, click Create & Add Another or Create Task to complete the creation of the task. Leaving the page or clicking Cancel will not save the task to the Guide.
Editing Tasks
When necessary, users can edit existing tasks. To edit an existing task, open the guide, then click the correct task. When editing an existing task, the task will open as a sidesheet.
Users can make any changes necessary, then close the sidesheet. To save the changes made to the task, after closing the task sidesheet, users must click the Save button  in the top right corner of the open guide.

Task Groups
Users can choose to create task groupings at any point when creating a task guide. Task groupings allows for the organization of tasks on a guide. Task group names as well as the list of tasks associated with them import to the My Tasks page for the assigned location(s). Organizing tasks into groups helps users navigate their work day tasks and locate tasks more easily.
Task groups can be customized as needed. Users can sort their tasks and task groups in a way that works best for their restaurant(s).
Naming Task Groups
Users may take varying approaches to the naming of their task groups. The name given to a task group should reflect the collection of tasks that are assigned to it
See the example below of organizing tasks into task groups. Click the example image to enlarge.
Guide Name | Task Groups | Example |
|---|---|---|
| Manager Guide | Organized by shift:
|  |
Organizing Tasks Into Task Groups
To organize tasks into groups, users can click the rearrange icon of any task. Click, drag, and drop the task into the task group it should belong to.

Rearranging Task Lists
The tasks groups/lists appear on the My Tasks page in the order that they are arranged in on the guide. To arrange a task list under a task group, click the rearrange icon of any task. Click, drag, and drop the task(s) into the order that the tasks belong.

To save any changes made to the task groups, click the Save button  in the top right corner of the open guide.