This article is part of the FTP Site documentation. Click here for more information on the FTP Site.
Restaurant365 provides each Customer with a Hosted FTP Site for file imports, which will enable AP/AR Invoices and Credit Memos to automatically be imported (if in an integrated format) into R365. Additionally, other files (.docx, .txt, .pdf etc.) can be imported in to the 'Documents to Process' screen for later processing. Click here for information on Importing Files via FTP, Supported File Types, and Documents to Process. Transactions are imported as 'Unapproved'.
Step 1: Request Access
In order to access your R365 FTP Site, you will need to contact R365's Non-POS Integration Support team to obtain your unique FTP credentials (username and password) for your database.
While an AR Imports FTP Site will be auto-generated for you, an AP Imports FTP Site will not. Ensure to request an AP Imports FTP Site as well if needed. Click here to create a ticket.
Step 2: Provide FTP Site Credentials to Your Vendors
Provide the FTP site credentials to your Food & Beverage Vendors that have dedicated invoice integrations with Restaurant365. All files that are placed in the folder (from you or your Vendors) will be automatically imported in to Restaurant365.
Step 3: Connect Your Computer to the Site
There are various ways that you can connect to an FTP Site. We will outline the steps to use Windows Explorer (for Windows 7/10) and CyberDuck for Mac. You can also choose to use your own FTP Client Application for accessing and uploading files to the R365 FTP Site.
Steps for Windows 7/10 PC
- Open a Windows Explorer folder, right click This PC in the left hand pane, and click Add Network Location

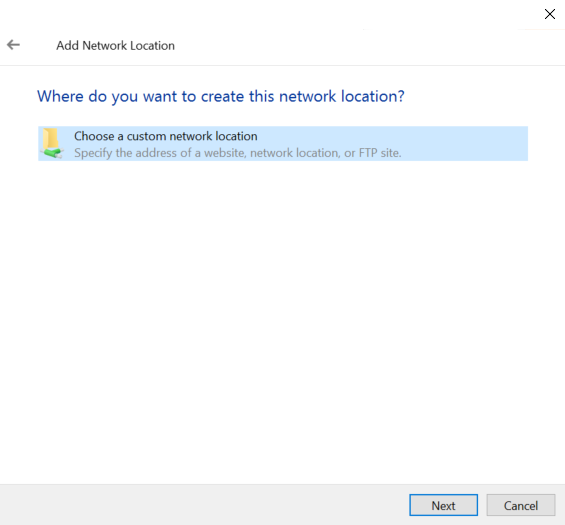
2. In the window that pops up click Next and then click "Choose a custom network location"
3. Type ftp://connect.restaurant365.net and click 'Next'

4. Uncheck the box for 'Log on anonymously' and type in your ftp user name provided by Restaurant365 when they setup your FTP site and then click 'Next'

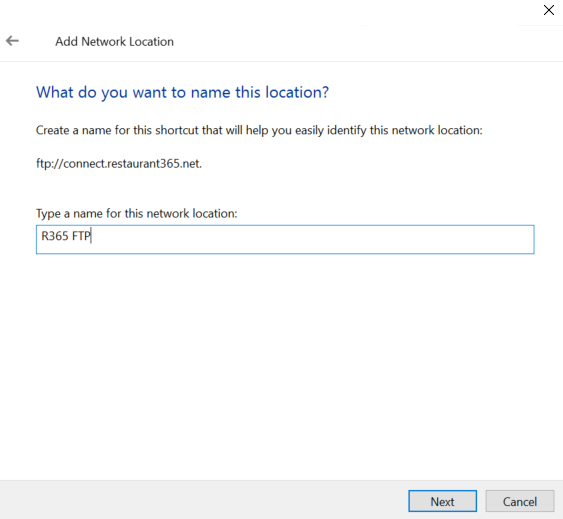
5. Type the name R365 FTP to help you recognize this folder in the future and then click Next and Finish and it will create the new FTP folder in your windows explorer window
Steps for Mac
Mac does not have a similar built in FTP client like Windows does, so you'll need to download a 3rd party FTP tool from the App store.
- Under Apple - System Preferences - Network - Advanced - 'Proxies' Tab, uncheck the option for 'Use Passive FTP Mode (PASV)' and then click 'OK'

- Next, download your preferred FTP client from the App store such as cyberduck (you could go to this link https://cyberduck.io and click to download from the app store from there)
- Once in your preferred FTP client for Mac, enter the following info (cyberduck shown below for reference):
- FTP address of ftp://connect.restaurant365.net
- Enter the R365 FTP username and password provided by Restaurant365 when they setup your FTP site
- The last step is to change the Connect Mode to 'Active (PORT)'. In cyberduck this is accomplished by selecting 'More Options' and making the selection to 'Active (PORT)'

Once these steps have been followed, you can proceed to import transactions and files in to your FTP Site. If your Vendors have the ability to push invoices directly in to R365, you can provide your FTP Credentials to them for automatic invoice imports.
Click here for information on Importing Files via FTP and more information on EDI Vendor Integrations.


